(Read a personal description of Backblaze here.)
(by Brian Wilson, started 2/14/07)
(Read
a personal
description of Backblaze here.)
I have a very small network of exactly 7 machines, each has a specific purpose. Below is my network design and layout for security and functionality all based around the SonicWall TZ170W Firewall appliance as the one unified management for the whole network. An alternative would be to run several separate components (like Microsoft Exchange for Active Directory, DNS, VPN, etc) running on general purpose hardware, but the setup below allows *ALL* the network to be managed from the one unified and specialized TZ170W, and keeps it incredibly clean and away from any machine dependencies. Most of all it keeps all the network management and tracking and security rules all within one unified specialized box which keeps everything simple. So the TZ170W gives me a complete small business network setup of:
| A. Firewall - to prevent unauthorized entry into my "Internal Network"
(also called an "intranet" or "LAN" for "Local Area Network"). B. DMZ - a set of web servers serve web pages to the internet OUTSIDE the firewall, kept utterly separate and does not compromise my Internal Network C. NAT/DHCP Server - for machines on the Internal Network (inside the firewall) they all share one IP address D. VPN Access - for when I'm working remotely (like in a Starbucks coffee shop) and want to access files inside my network safely and securely E. Wireless 802.11b - Wireless access to my network for mobile devices like laptops of guests, but secure so it cannot be watched/sniffed F. Tracking/Reporting - this separate appliance can watch all network traffic and I can easily view the logs to see what is going on with my network |
Below is a diagram showing the network topology and how it is all based around the SonicWall TZ170W Firewall. The SonicWall TZ170W can provide EVERYTHING I need all in one place to manage my network security and layout, completely platform independent (see below for Linux, Macintosh, Windows all in the network). The TZ170W piece of hardware itself is about $400, but I had to spend another $600 on licenses to actually enable the DMZ and VPN functionality. WARNING: the TZ170W can *ONLY* have a DMZ (which plugs into the "OPT Zone Port") if you buy the "Sonic Enhanced OS". If I had it to do over I would only buy the TZ170 (no "W") which IS CHEAPER and CAN HAVE A DMZ in the Sonic Standard OS!!! The "W" means "wireless", and basically when you get "Wireless" you *LOSE* the DMZ/OPT port, which is really, REALLY annoying. Click Here to see a picture of these TZ170W OPT ports which are completely disabled until you pay $500. Another warning is that the manuals are terrible, and the GUI uses ambiguous terms all over the place (see the screen shots below), and SonicWall has famously terrible technical support (they farm it to the cheapest India skype-based support, so it really is awful). But once you struggle through it, the little TZ170 boxes have a ton of functionality for a reasonable price.
What you see below is:
$400 - SonicWall TZ170W Firewall
$500 - "Sonic Enhanced OS" license so
that I can have a DMZ on the "OPT" port
$100 - Licenses for two VPN Clients
to connect at once, each is $50
$150 - Netgear GS116 Gigabit Switch (16 port
for intranet)
$ 82 - Netgear GS108 Gigabit Switch (8 port for DMZ)
$ 60 -
Cat6 Premade Ethernet Cables (10-ish of them of various lengths)
--------------
Total: $1,292. NOTE: you can save $500 by getting the
TZ170 with "Sonic Standard OS", and buy a $100 wireless access point instead.
Here is the setup (click on the picture below for a much larger version that is more readable):
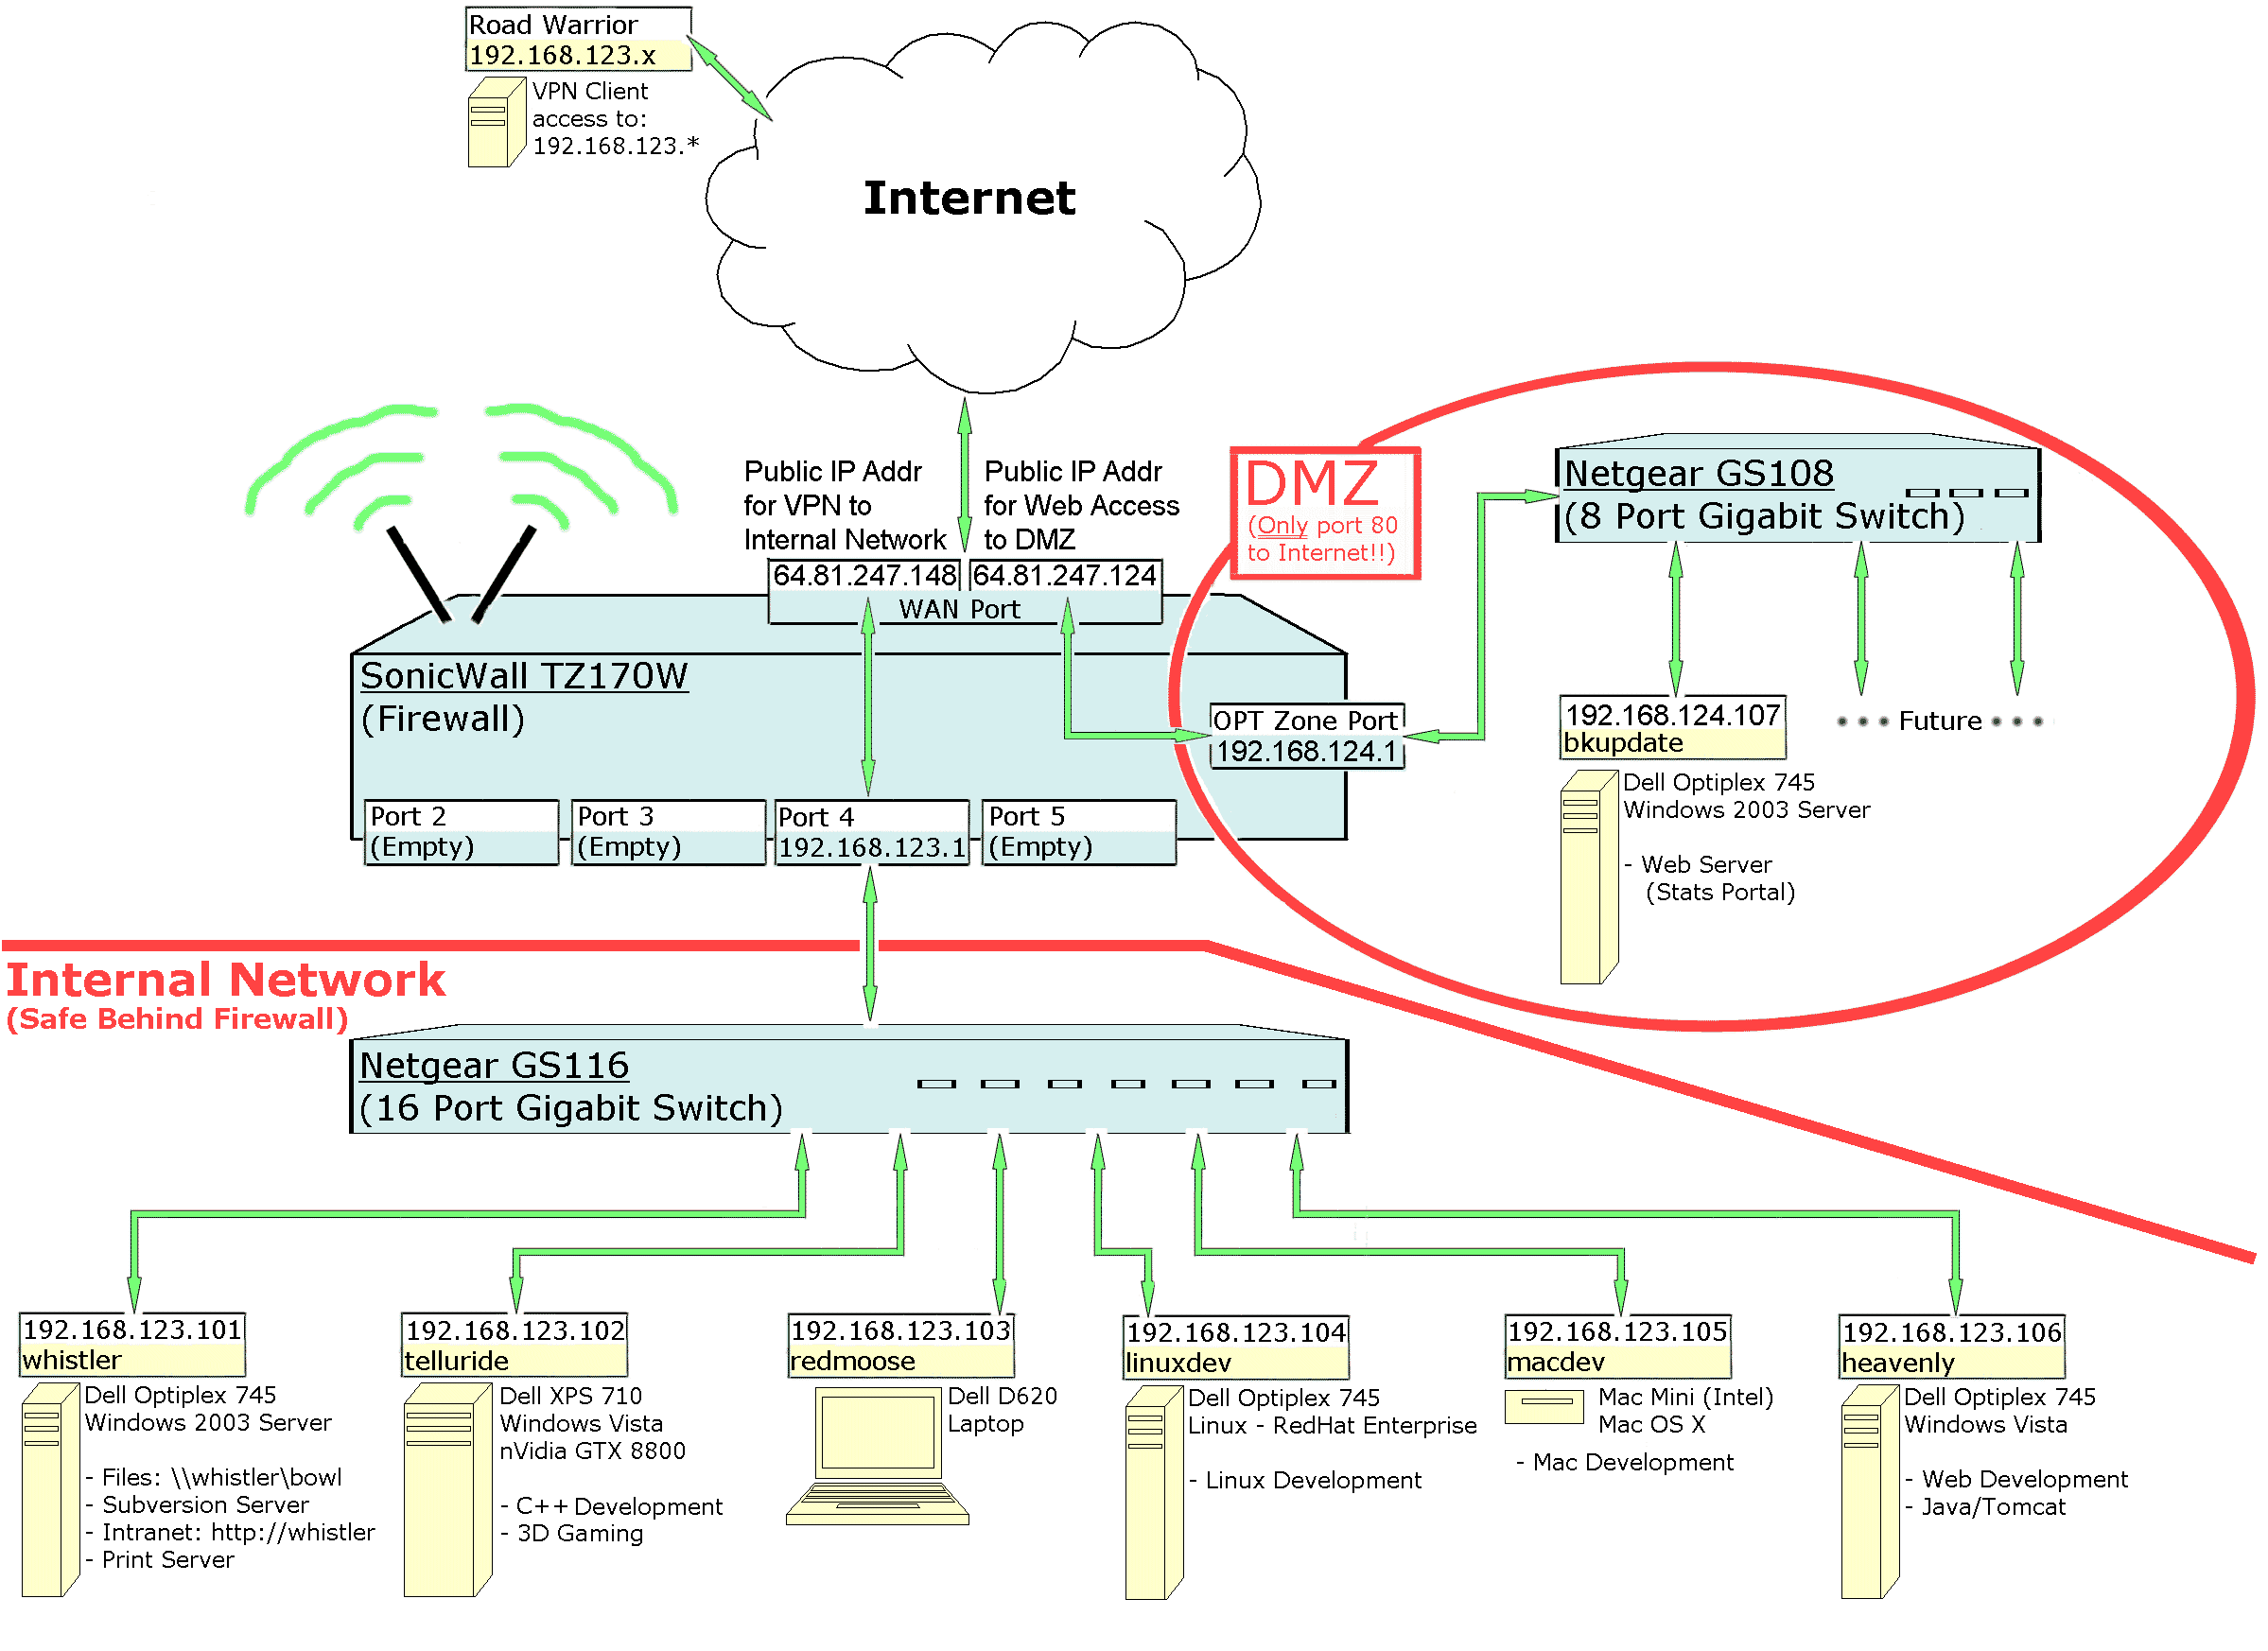
If you look at the picture above, the reason I put a Netgear GS116 Gigabit Switch below the TZ170W was that the SonicWall TZ170W can only handle 100 MBit networking (a shortcoming of the SonicWall TZ170 since no computer on earth ships with that slow of a network card anymore). In the picture above, if I want to check out a large source code tree from Subversion, or copy large files, the Netgear Gigabit switch allows the transfer to go at 10 times the speed as if you just used the "Port 2", "Port 3", "Port 4", "Port 5" on the back of the SonicWall TZ170. With the setup above, I timed some large file copies over Windows File Sharing and I'm getting about 300 Mbits/sec transfer rates between these machines, which is 37.5 MBytes/sec, which sounds like it is limited by how fast it can write the files to disk.
From any machine on the internal network, the "Default Gateway" (where it sends all network packets to be delivered onward after that) is the SonicWall TZ170 Firewall, and I configured the TZ170 to listen on IP addresses 192.168.123.1 as the default gateway, and then most of the machines are at IP addresses 192.168.123.101, 192.168.123.102, etc. The reasons for this is that "192.168" is reserved for private internal networks, anything I do there is my own business. I chose the "123" part of "192.168.123" randomly, but it was important to NOT be the default because of a limitation (horrible bug) of the SonicWall TZ170 VPN to make the "123" unique and different than ANY of the networks in the world where people (like myself and my employees) might want to VPN into my network. Yes, in theory it is completely flawed to say a number from 0 to 255 is globally unique, but in practice there are only a very few people that can VPN into my network, and so this works well enough. Also, it helps make it clear when debugging VPN issues which addresses were handed out by my network, and which are from the local Starbucks coffee shop you are sitting in. When I see "123" I know it is from my own private network.
From any machine in the DMZ, the "Default Gateway" (where it sends all network packets to be delivered onward after that) is the TZ170, and I configured the TZ170 to listen on IP addresses 192.168.124.1 as the default gateway for the DMZ. This makes the DMZ a separate subnet from the Internal Network, and allows me to write very specific firewall rules like ONLY allow port 80 (web traffic) in and out of the DMZ. The "124" part of "192.168.124" is randomly chosen. Example Story-> At a previous company, our web servers were infected by a spambot (a virus that sends spam), and so my philosophy now is to lock down every port in and out of the web servers except what they absolutely need open, which is port 80. If the spambots infect these DMZ machines, the spambots cannot send email (which goes out on port 25).
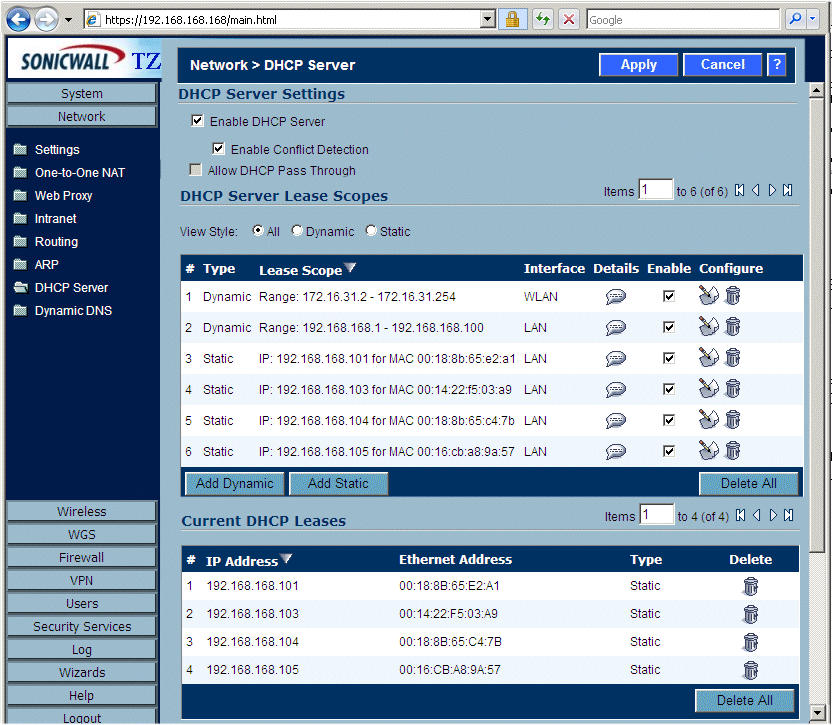
When any machine is booted, it asks the SonicWall TZ170 for an IP address via DHCP. We can configure the TZ170 to always hand each machine a reproducible address, for example "whistler" is *ALWAYS* 192.168.123.101 which makes it easy to do everything else. For example, for working locally I can reduce all dependencies on external DNS servers. Also, I can debug problems that come up by knowing the IP address separate from the machine names. Most geeks would say I should run a full Windows Exchange Server, Domain Controller, and DNS servers but that is some super complex software that needs to be constantly patched for security reasons and introduces endless problems and complexity and support headaches. Running a DNS Server and Windows Domain Controller for 6 machines is like hitting a thumbtack with a sledge hammer.
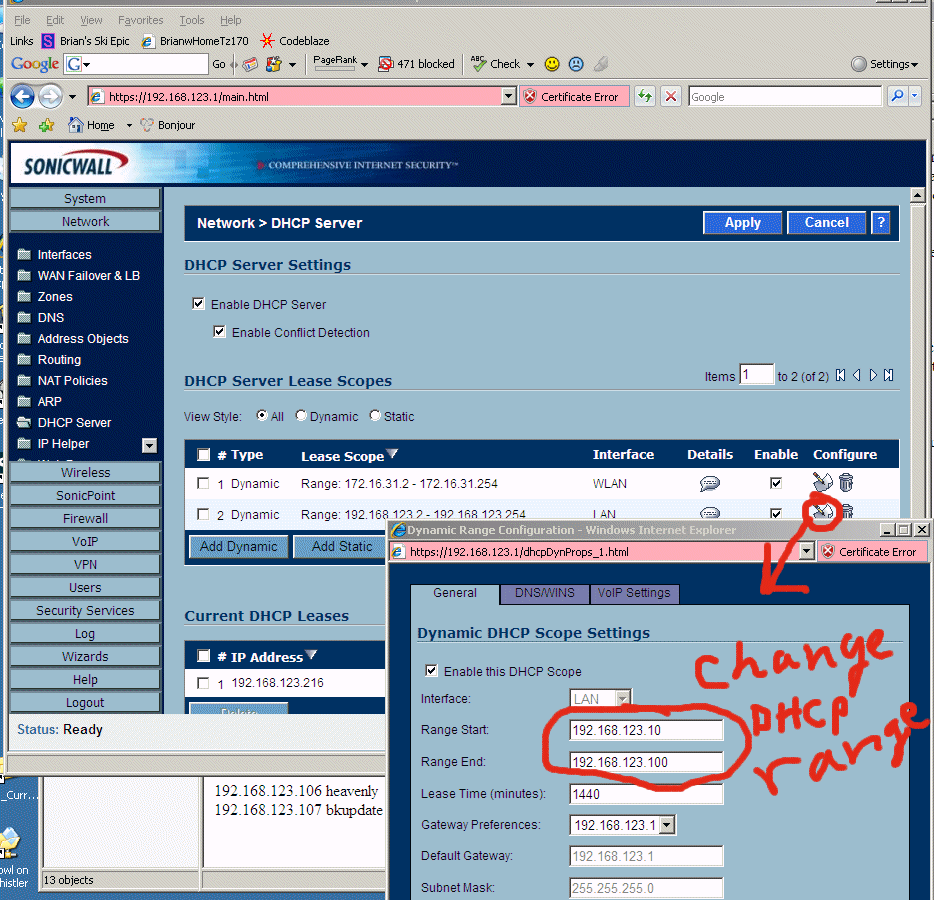
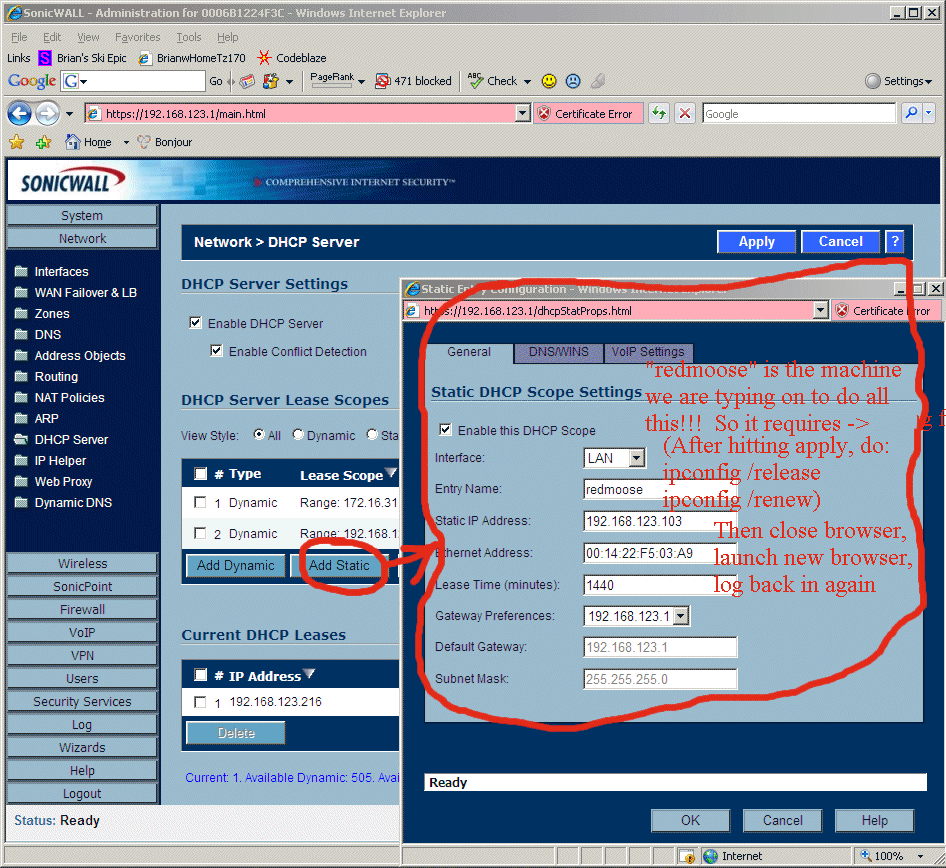
Here's the basic way we do this in the TZ170's web GUI (see the bottom of this web page for detailed screen shots and notes about this!!). In the TZ170's web GUI, under "Network"->"DHCP Server", in the section called "DHCP Server Lease Scopes" first we use the "Edit this Entry" button (this buttons looks like a little notepad icon in the "Configure" column) on the "LAN" line to change the range of DHCP to be 192.168.123.10 to 192.168.123.100 to give us room for the entries below.
Then we change the "internal network's default gateway" to be
192.168.123.1 (see the detailed screen shots at the bottom of this page).
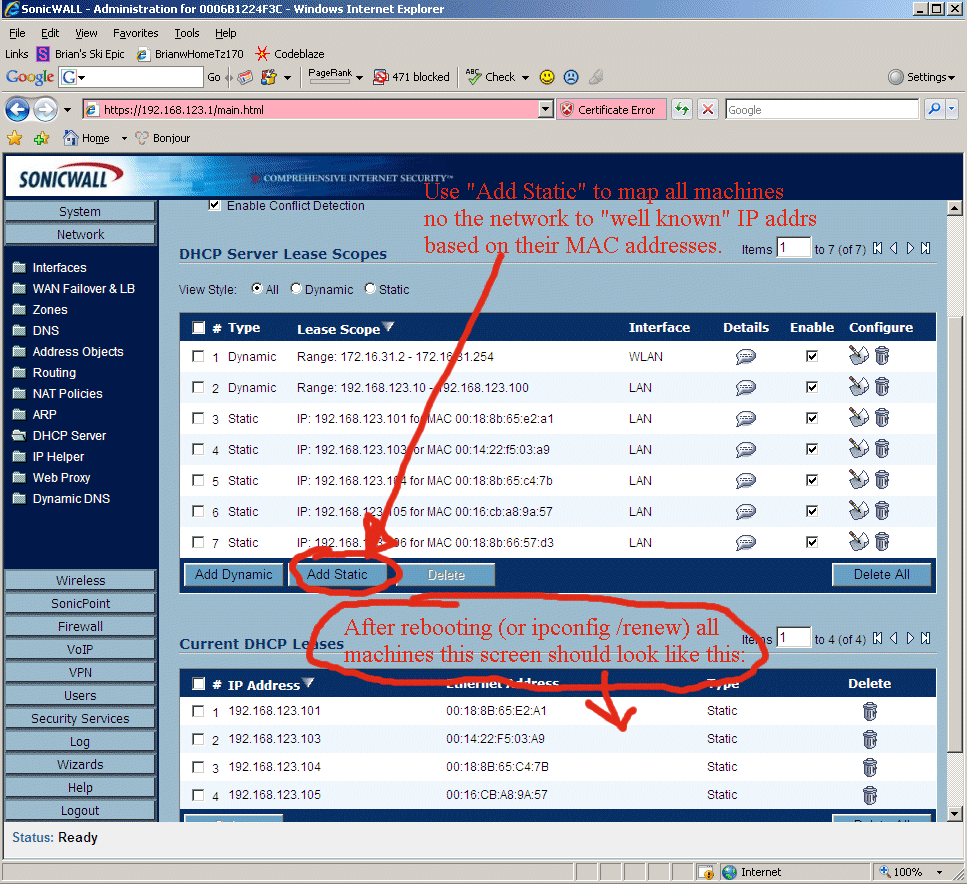
Finally, we use the "Add Static" button to permanently assign the well known IP
Addresses to each well known machine on my network (see table below).
Explanation of terms-> a "MAC_Address" is the 48 bit globally unique identifier
assigned to a network card at time of manufacture. An "IP_Addr" is the more
temporary identifier assigned by whatever network the computer is plugged into.
The "Short_Name" is the "non-qualified hostname of the machine" such as
"whistler". A "fully qualified hostname" would look like "store.apple.com",
while the "store" is the non-qualified or "short name". Click here
to view a screenshot of the finished TZ170 Screen (after rebooting all
machines to pick up their newly assigned IP addresses) looks like.
Short_Name - IP_Address - MAC_Address - OS - Description
whistler - 192.168.123.101 - 00:18:8B:65:E2:A1 - Windows 2003 Server-
subversion server, "bowl" file share, print server
intranet - 192.168.123.101 - this is an alias for the above "whistler"
telluride - 192.168.123.102 - 00:19:B9:4A:5B:94 - Windows Vista - Brian's
Primary Development Desktop
redmoose - 192.168.123.103 - 00:14:22:F5:03:A9 - Windows XP Pro - Brian's Laptop
linuxdev - 192.168.123.104 - 00:18:8B:65:C4:7B - Linux RedHat Enterprise - Linux
development machine
macdev - 192.168.123.105 - 00:16:cb:a8:9a:57 - Mac OS X 10.4.8 (Tiger) -
Macintosh development machine
heavenly - 192.168.123.106 - 00:19:D1:87:3B:40 - Windows Vista - Billy's
Primary Development Desktop
bkupdate - 192.168.124.107 - 00:18:8B:65:DB:27 - Windows 2003 Server, Stats Portal -> DONE LATER, see "DMZ Setup" in Chapter 7.
briantivo - 192.168.123.108 - 00:04:5A:9E:F0:FE - Brian's Tivo,
adding it statically makes it easier to do logging
taos - 192.168.123.109 -
00:18:8B:66:57:D3 - Windows Vista - "guest development" machine
corpstage - 192.168.123.110 -
00:18:8B:65:DB:27 - Windows 2003 server - "stage for
www.<corpname>.com"
caseyslaptop - 192.168.123.111 - 00:1B:63:9A:ED:64 - Casey's Mac Laptop
squaw - 192.168.123.112 -
00:15:C5:7E:39:FC - Gleb's Dell Laptop
bzsvn - 192.168.123.113 -
00:15:C5:1B:00:07
- subversion (source code control) server
When using the "Add Static" button, the "Entry Name" is the ";Short_Name", and
I left the "Lease Time" to be 1440 minutes which is 1 day.
By default, anytime you specify a hostname like "maps.yahoo.com"
on a computer, the computer asks the DNS servers at your ISP to "resolve"
that to an IP address. Since these are all machines on my internal network "hiding"
behind the firewall, the ISP DNS servers do not know about them. The way
to override this is to edit the "hosts" file to specify "hostname to IP address
mappings" (on Linux and Macintosh this is /etc/hosts, and on Windows it is
C:\WINDOWS\system32\driver\etc\hosts). Anything specified inside the
"hosts" file on a computer will stop there, and not ask the DNS servers.
So we add these lines below on every machine inside our network:
192.168.123.101 whistler
192.168.123.101 intranet
192.168.123.102 telluride
192.168.123.103 redmoose
192.168.123.104 linuxdev
192.168.123.105 macdev
192.168.123.106 heavenly
192.168.124.107 bkupdate - in the DMZ (notice the "124")
192.168.123.108 briantivo
192.168.123.109 taos
192.168.123.110 corpstage
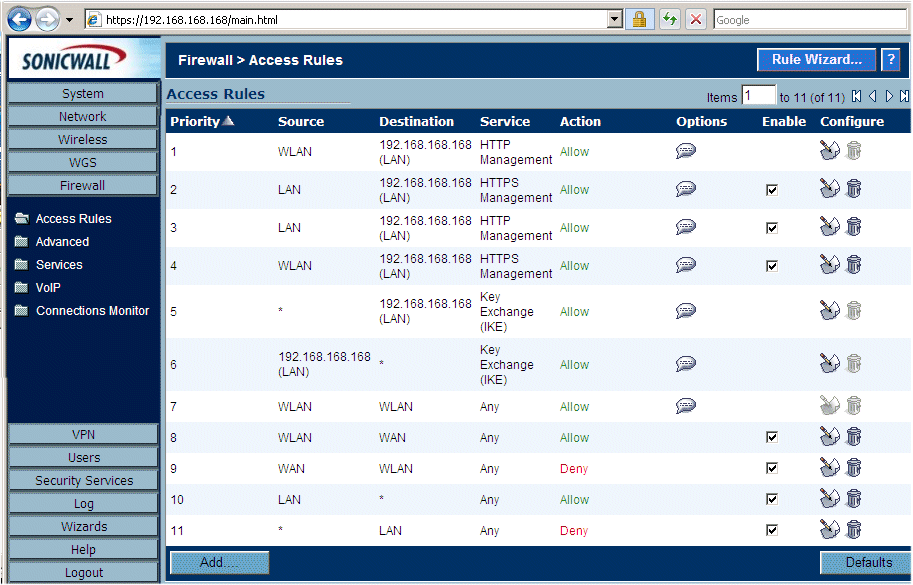
Here is a screenshot of the TZ170 default firewall access rules (click the lower right "Defaults" to restore it to these). XXX - NEED TO UPDATE WITH FINAL DMZ design.
We want to allow users working remotely to VPN into this small network. The first step is to purchase a $50 "Global VPN Client" license from http://www.mysonicwall.com, if you need 2 people connected at the same time, buy 2 of these, etc. You will get an 8 character activation key that looks like "VC6TYMET". In your TZ170 web admin, go to "Security Services" -> "Summary", and find the button that says "Synchronize With MySonicWall" and click it. It should get the Global VPN Client Licensed.
Now enable VPN. In the TZ170's web interface, go to "VPN" -> "Settings", first click "Enable VPN" at the very top. Then click on the "edit" icon (looks like a notepad) on the "GroupVPN" policy. In the popup, choose the "Client" tab, then change "Virtual Adapter settings" to be "DHCP Lease", and change "Allow Connections to:" to be "Split Tunnels".
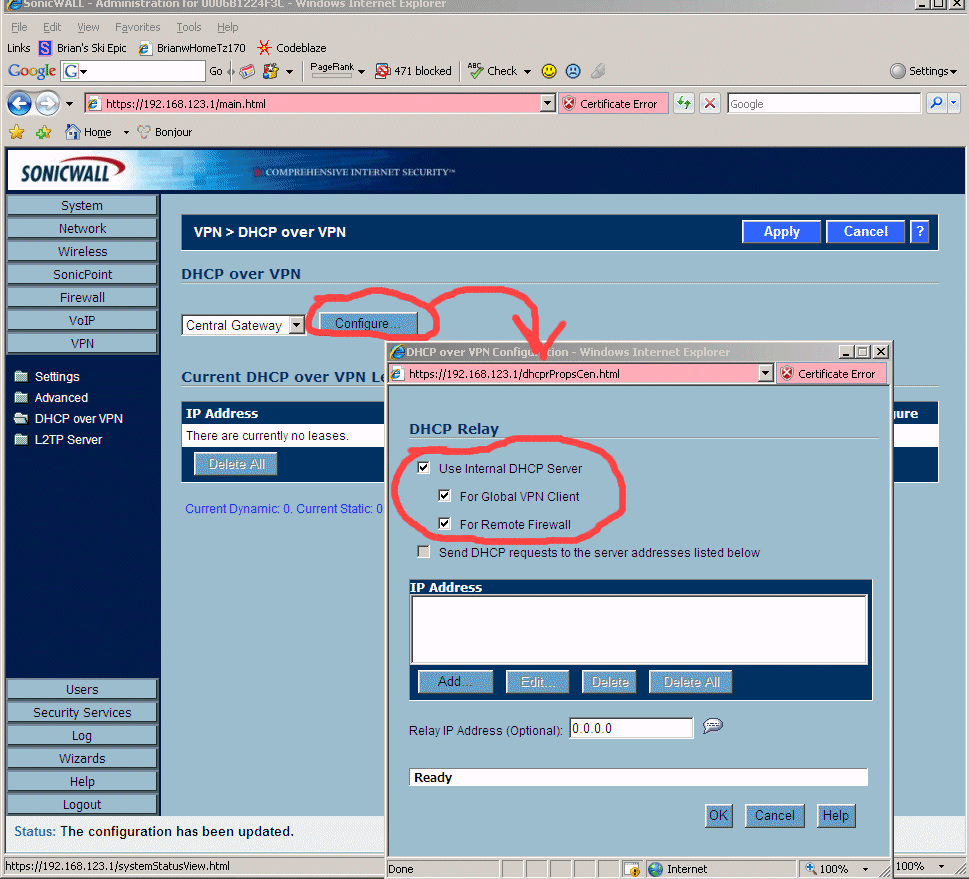
Then you have to "Enable DHCP over VPN". In the TZ170's web interface, go to "VPN" -> "DHCP Over VPN" and figure out how to configure the "Central Gateway" (that is SonicWall's confusing term) to provide DHCP to remote clients. See the VERY detailed screen shots and instructions at the bottom of this page about these VPN steps.
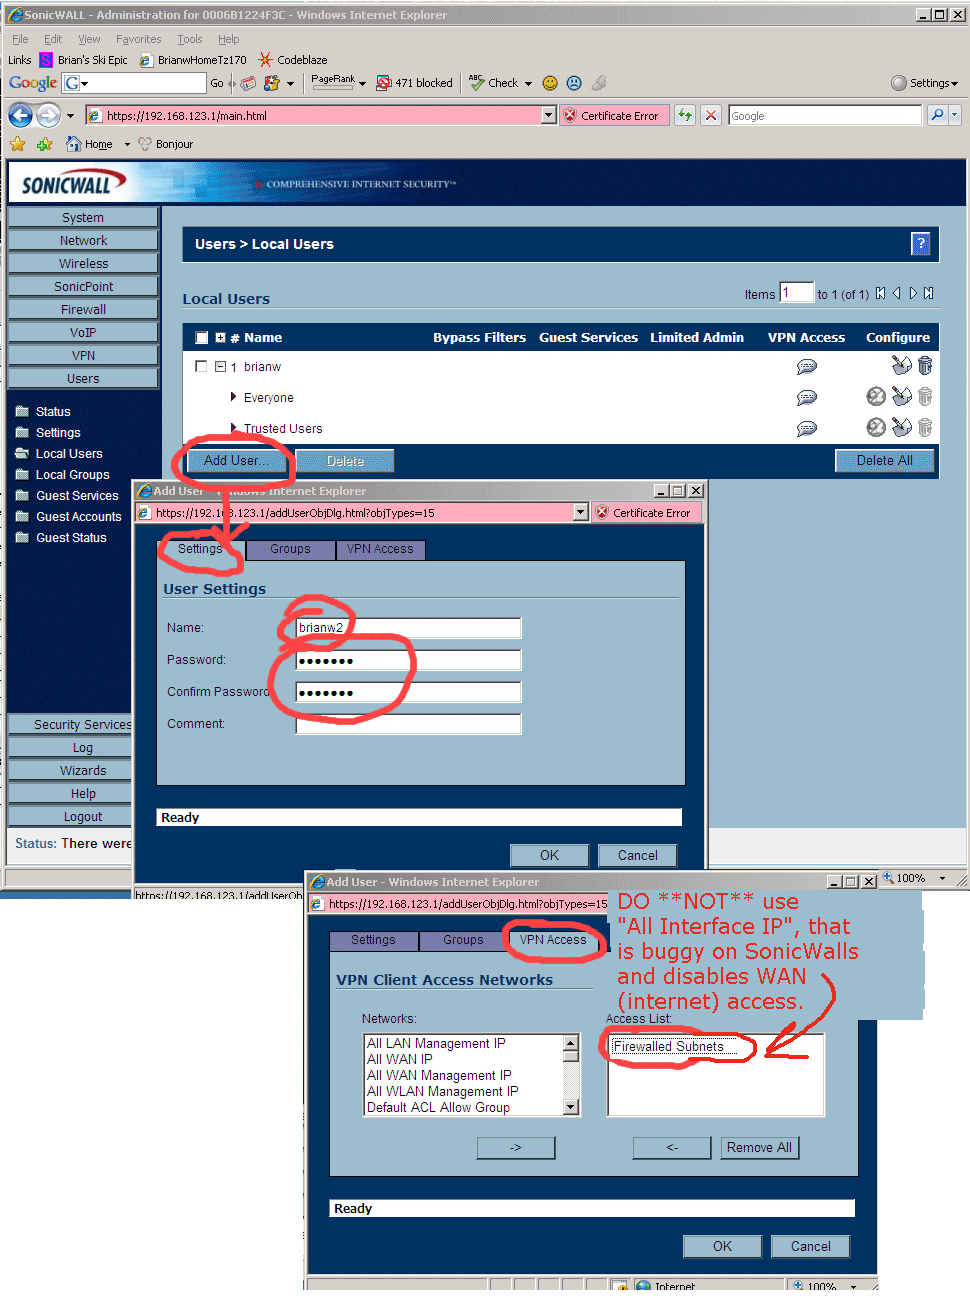
Now create a VPN login into the network. In the TZ170's web interface, go to "Users" -> "Local Users" and "Add...", type in a username and password, make sure only "Access from VPN client with XAUTH" is checked.
ON A COMPUTER OUTSIDE THE FIREWALL (out in a Starbucks), Download this SonicWall Global VPN Client, install it, and log in.
Setting up the DMZ on the OPT Port of the SonicWall TZ170W firewall using SonicWall Enhanced OS *SHOULD* be a checkbox or two, and instead is a 15 step insanely non-intuitive process. None of this actually makes any sense, just do these steps and the firewall seems to suddenly understand you want a straight-forward DMZ and it configures itself. SonicWall GUIs are really, REALLY bad. To see detailed screenshots of every one of these steps, go to the bottom of this web page and search for "DMZ" in the screen shots section (start at section 8.25). Here is the summary of the steps:
7.1 - Enable SonicWall TZ170W Firewall OPT port - On screen "Network"->"Interfaces", click "Edit/Notepad" icon by the "Opt" port, and in the popup dialog assign it a zone of "DMZ", IP Assignment of "Static", an IP Address of 192.168.124.1 (the default gateway for the DMZ subnet).
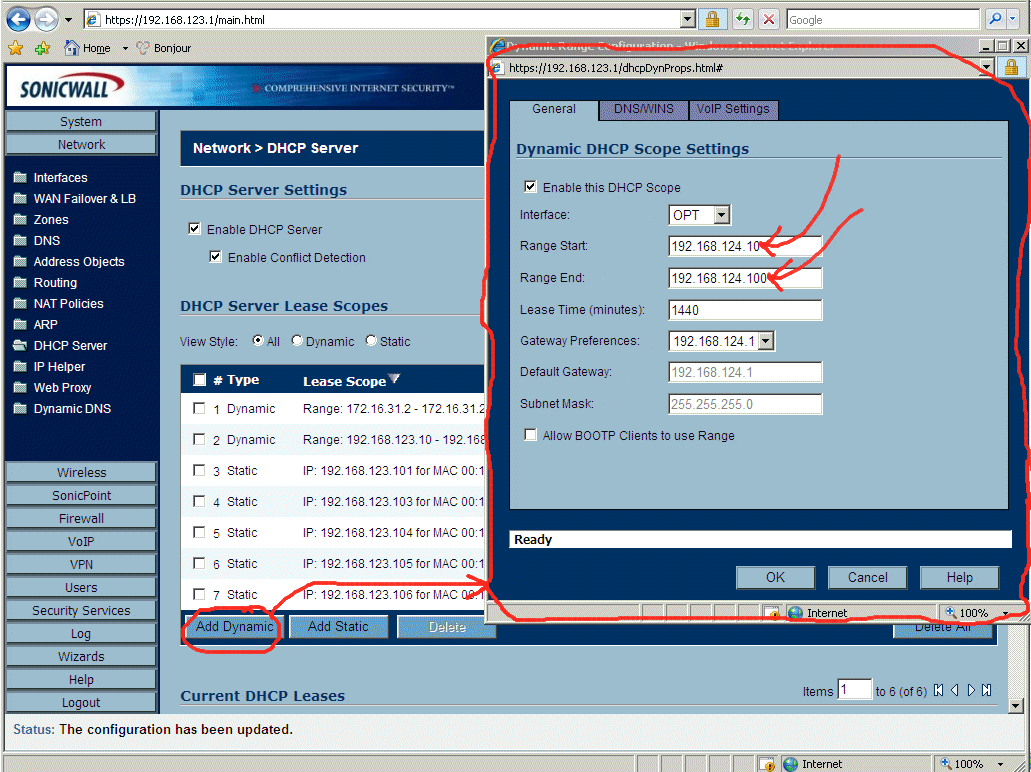
7.2 - Allocate DMZ range of IP addresses for OPT port on SonicWall TZ170W - On screen "Network"->"DHCP Server", click "Add Dynamic" and specify a range that starts at 192.168.124.10 to 192.168.124.100 with a default gateway of 192.168.124.1.
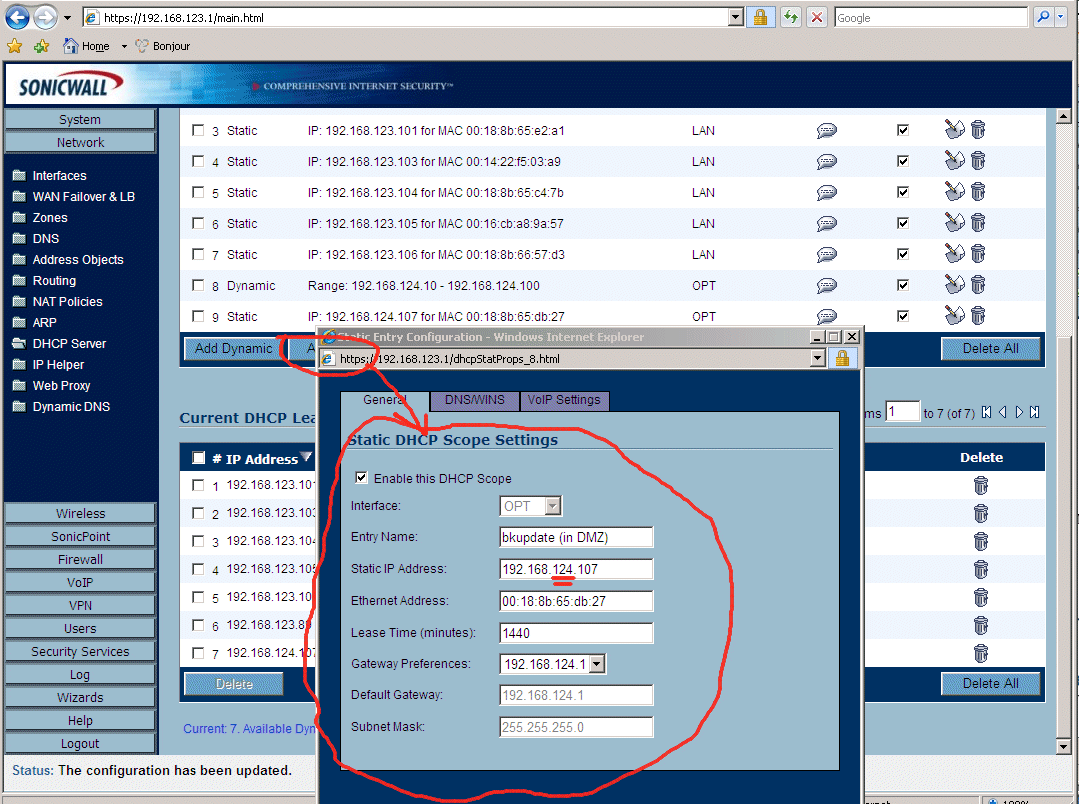
7.3 - Assign well known IP address to all machines in the DMZ running on the OPT port on the SonicWall Firewall TZ170W. We do this in "Network"->"DHCP Server" with the "Add Static" button and mapping the 48 bit Mac Address to the machine "bkupdate" to IP address 192.168.124.107 so we know what it's IP address in the DMZ is.
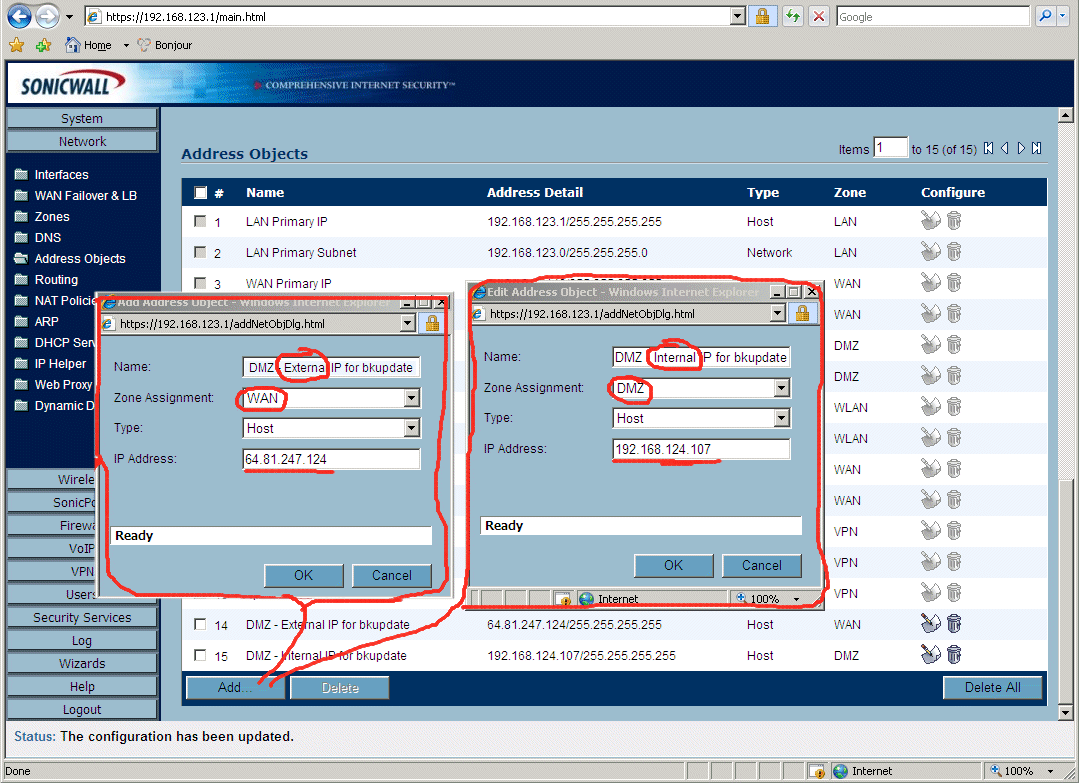
7.4 - Create silly magic objects "DMZ - External IP for bkupdate" and "DMZ - Internal IP for bkupdate". Do this in the "Network"->"Address Objects" page. For the external object the Zone is WAN and IP address is the public one (64.81.247.124). For the internal object the zone is DMZ and the IP address is the private one (192.168.124.107).
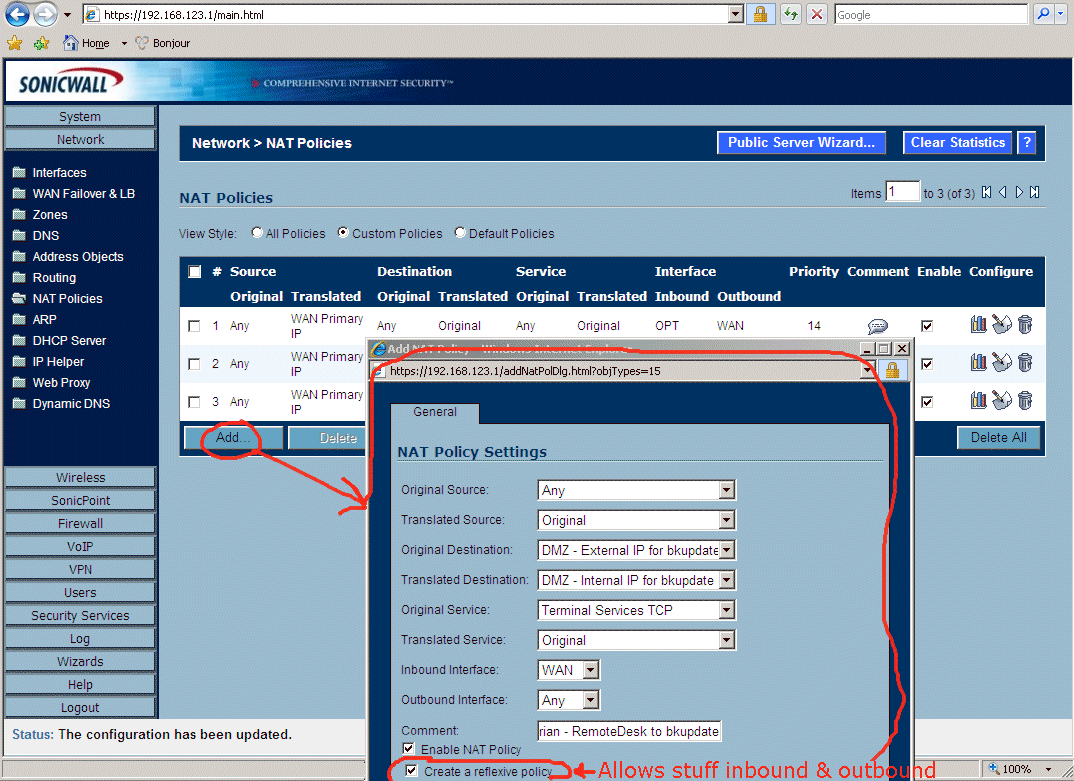
7.5 - Use the silly objects above to do port mapping in the SonicWall TZ170W Firewall DMZ. In "Network"->"Nat Policies", click "Add..." and make "Original Source" be "Any", "Translated Source" be "Original", "Original Destination" be "DMZ - External IP for bkupdate", then make "Translated Destination" be "DMZ - Internal IP for bkupdate", then make "Original Service" be "Terminal Services TCP" (Terminal Services is Remote Desktop in Windows, we are using that as an example), then make "Translated Service" to be "Original", then "Inbound Interface be "WAN" and outbound interface be "Any". BE SURE to check the box "Create a reflexive policy" or the packets can only enter and not leave.
7.6 - The final step is to write a firewall access rule on the SonicWall TZ170W Firewall DMZ. For this example, I used "Terminal Services" which is Window's Remote Desktop so that I could test it immediately (I didn't have a web server setup at this moment). In the screen below, I first had to click on "Firewall"->"Access Rules", then click on rules associated with "WAN"->"DMZ", then I clicked "Add..." and added an Allow rule from zone WAN to zone DMZ of service "Terminal Services TCP" with source "Any" and Destination "DMZ - External IP for bkupdate" with users allowed of "All".
Detailed screenshots of the above steps can be found at the bottom of this web page, look for section 8.25 to start with, or search for "DMZ".
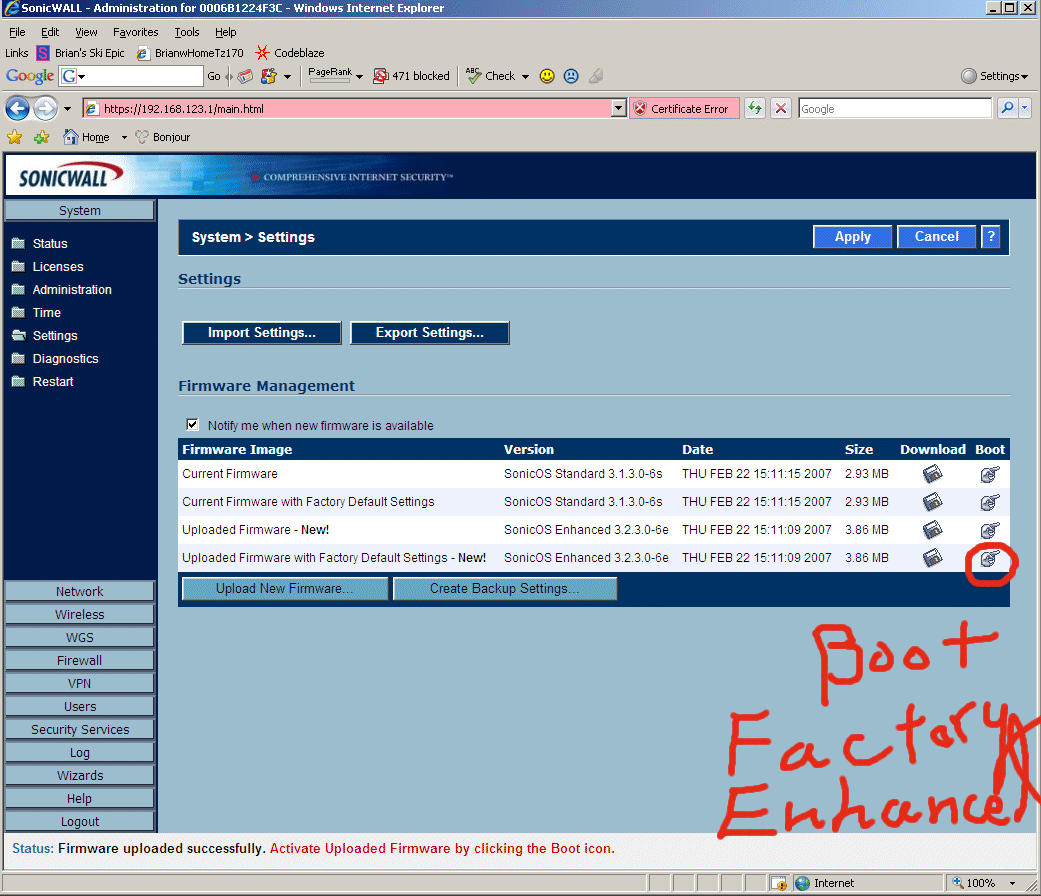
First of all, this is Sonic OS Enhanced on the SonicWall TZ170W, software version "SonicOS Enhanced 3.2.3.0-6e", ROM version "SonicROM 3.1.0.2". Here are the screenshots, with comments, annotations, etc.
8.1 - I uploaded the "SonicOS Enhanced 3.2.3.0-6e", and in the screen below I clicked on the big red circled button to boot it with factory defaults.
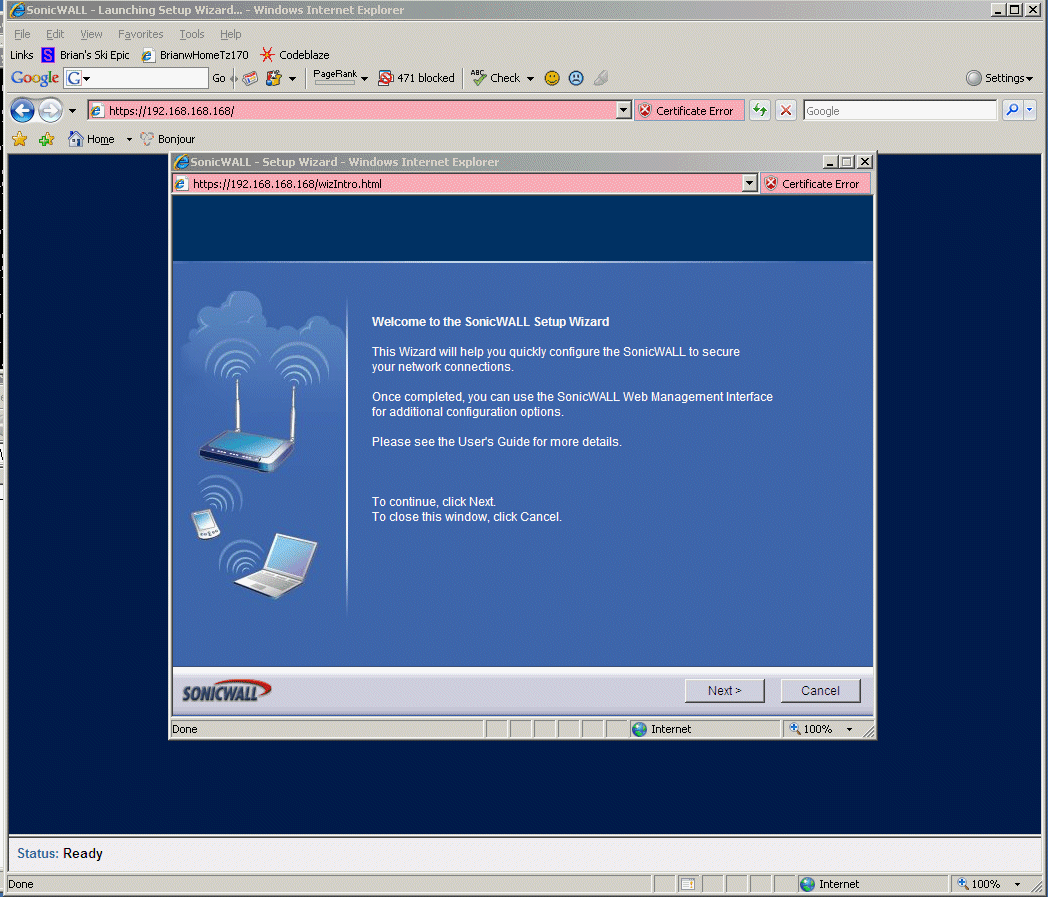
8.2 - TZ170W boots into the wizard below. If you stray from a SINGLE SOLITARY thing I have done here, you will probably have to return the TZ170 to factory settings and start over. These things are SUPER FRAGILE until they are fully setup. It doesn't look like SonicWall does any testing at all of this stuff, and if you touch any of the settings and change them from the defaults the TZ170 wedges and you have to start over from scratch. I started over from scratch probably 10 or 15 times to develop this path through the configuration. AFTER IT IS CONFIGURED -> The TZ170 is rock solid and you can play with the settings pretty safely. It is just a train wreck while you initially bring it online.
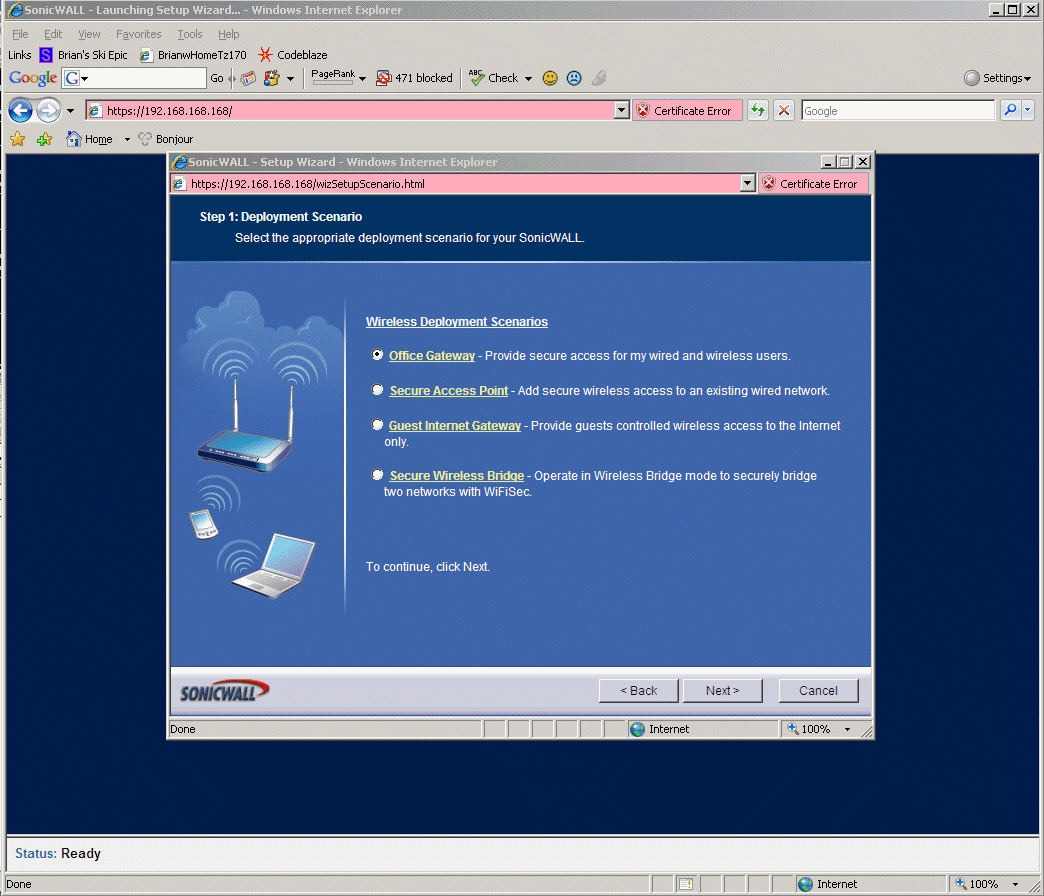
8.3 - The questions below are hilarious, and don't make any sense. Just pick the top option. USELESS RANT-> notice that the first, second, and fourth choice gives you the word "security", while the 3rd option uses the word "controlled". SonicWall just randomly uses any word they like, and it changes on every screen (and in the examples below changes randomly on each item choice). These are not standard terms, and none of the documentation explains what any of the terms actually means. This cracks me up -> it would only take somebody with some knowledge a few days to document the whole interface, but yet the documentation stinks. In every case the documentation just reads back what is on the GUI screen already, and adds no value. Pathetic.
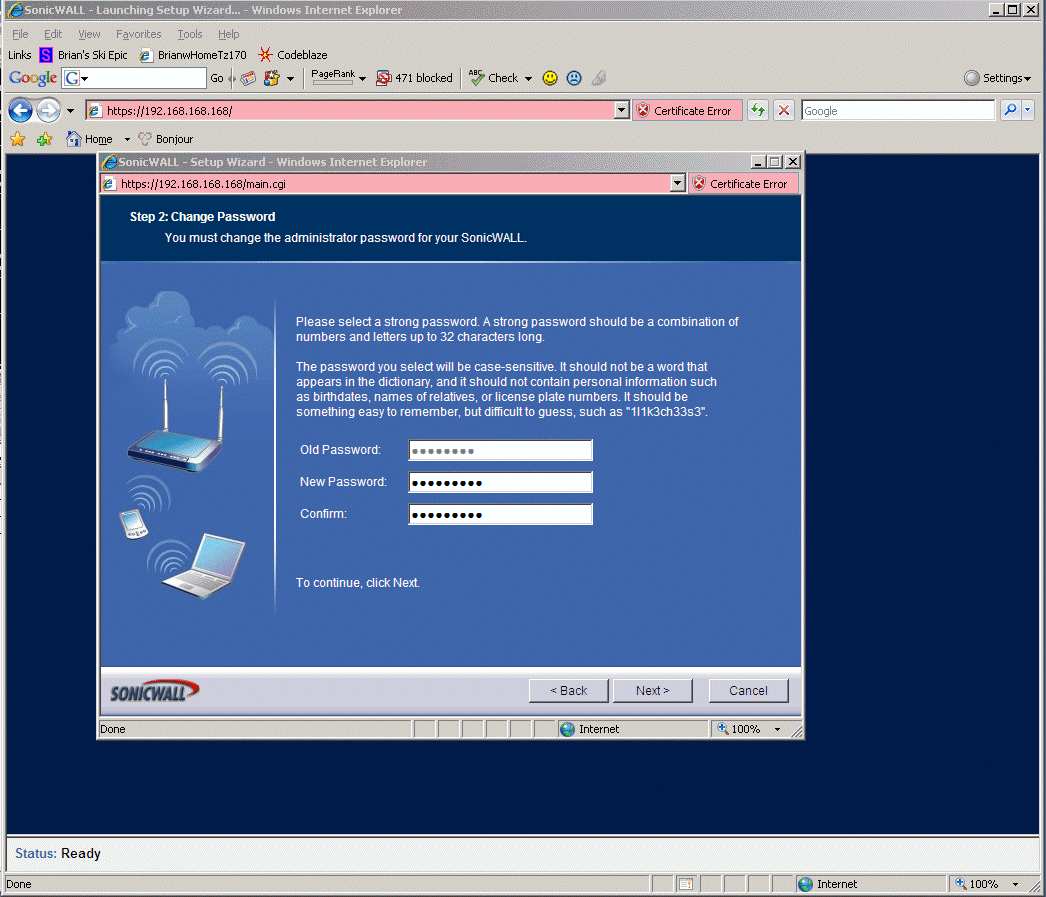
8.4 - Below you pick an administrator password for the TZ170W.
8.5 - a few screens were obvious here so I didn't include them.
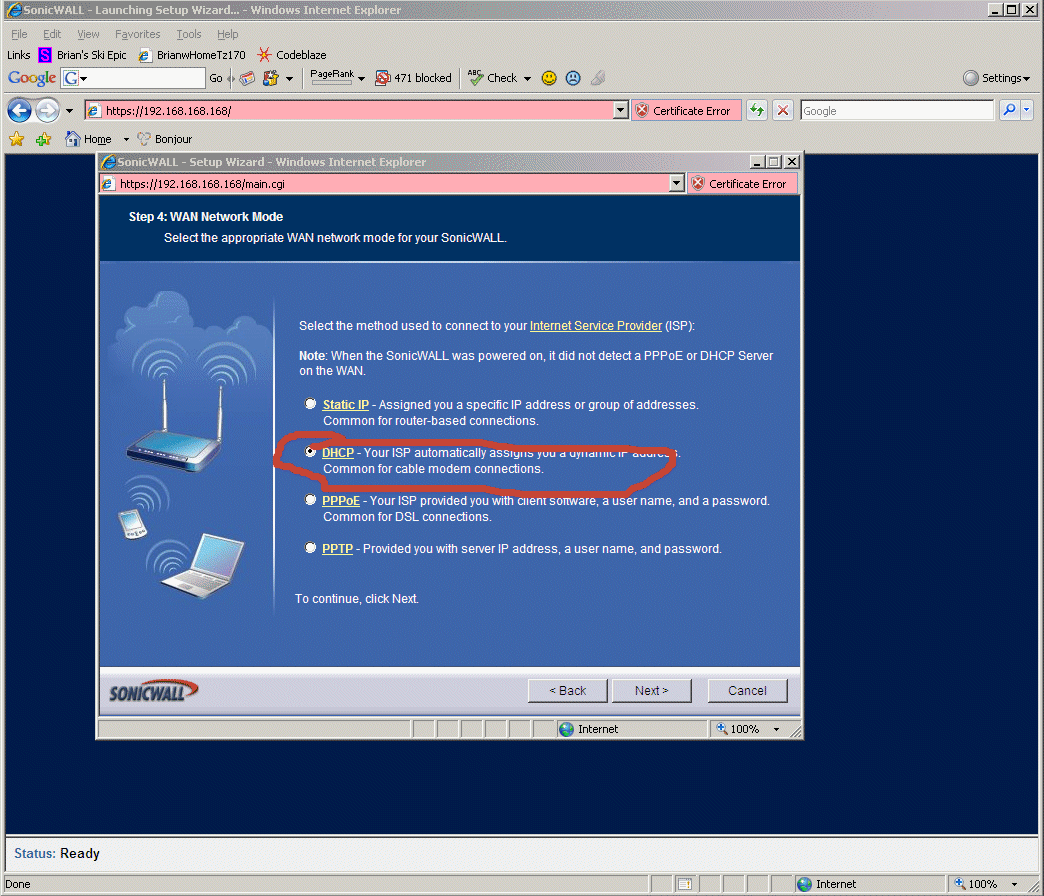
8.6 - At the time I wrote this, I was on a straight-up consumer $40/month ISP that hands out addresses by DHCP (Comcast Cable). See below for the correct choice for this on the TZ170W.
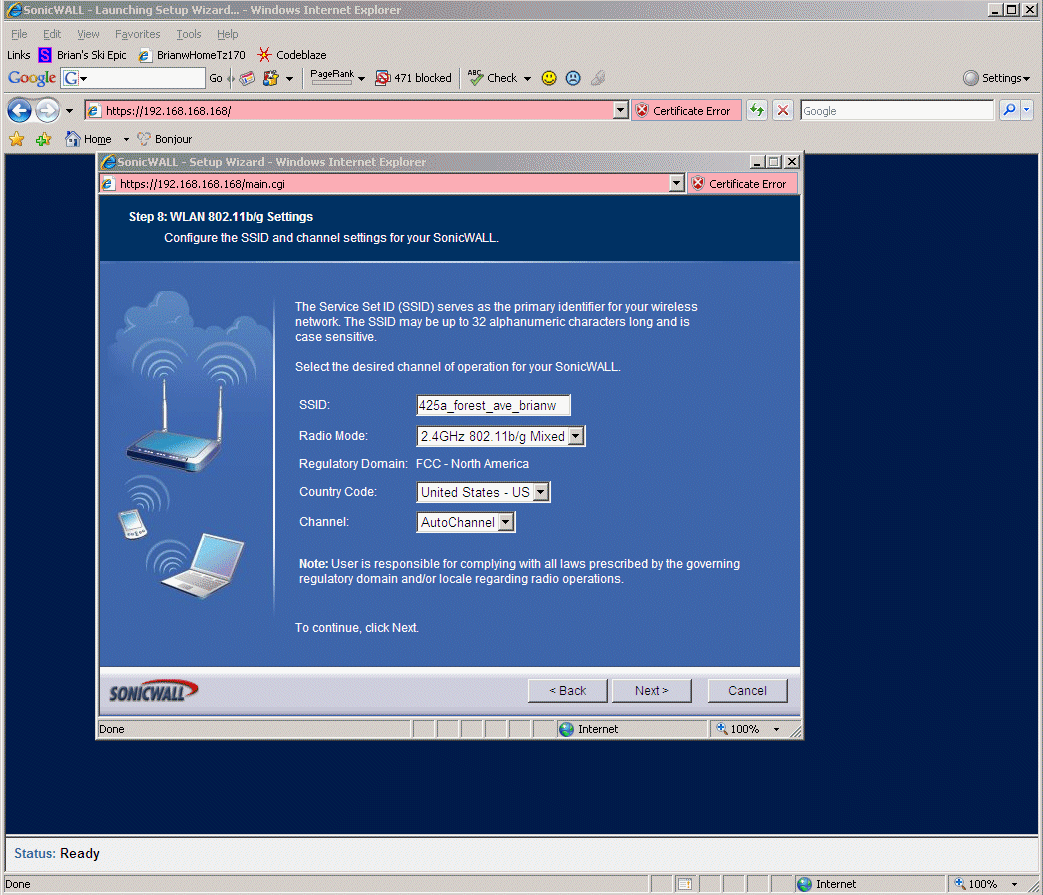
8.7 - Below I pick an SSID for the wireless (WAN) that gives people in my local neighborhood a clue as to where it is coming from.
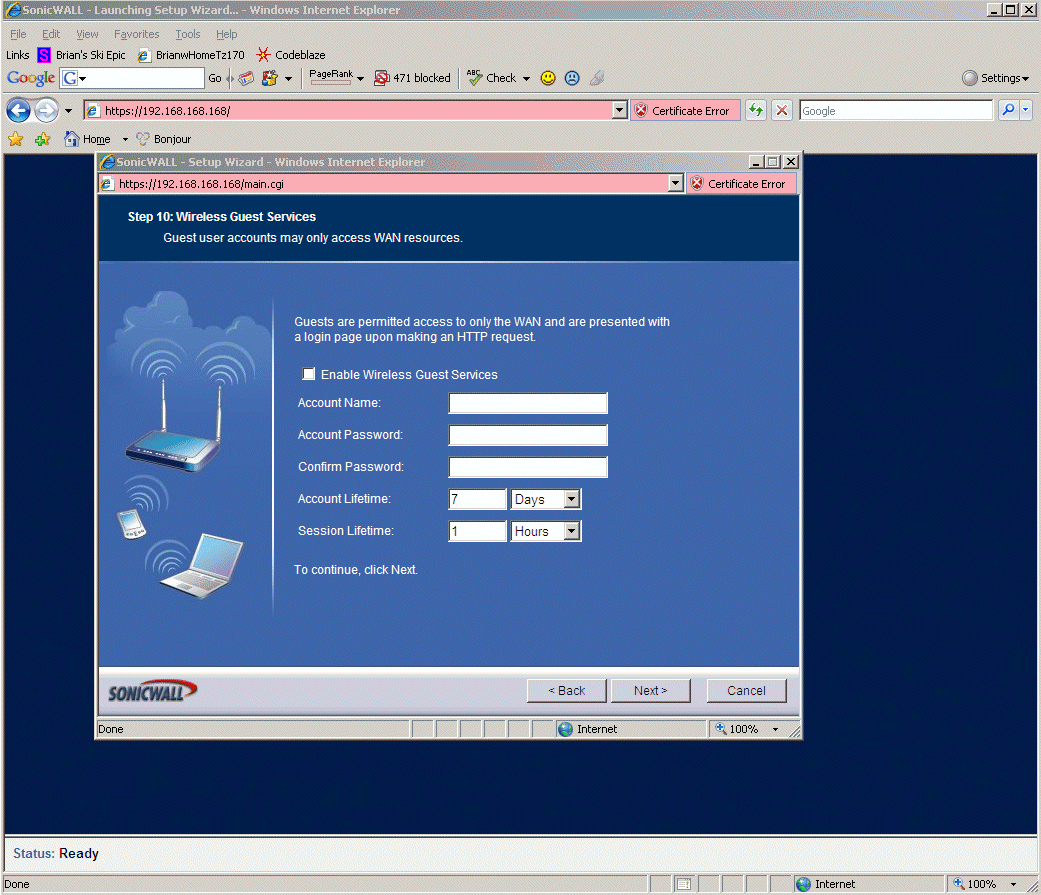
8.8 - I can't seem to figure out anything about this "Guest Access" stuff below, so I left it blank.
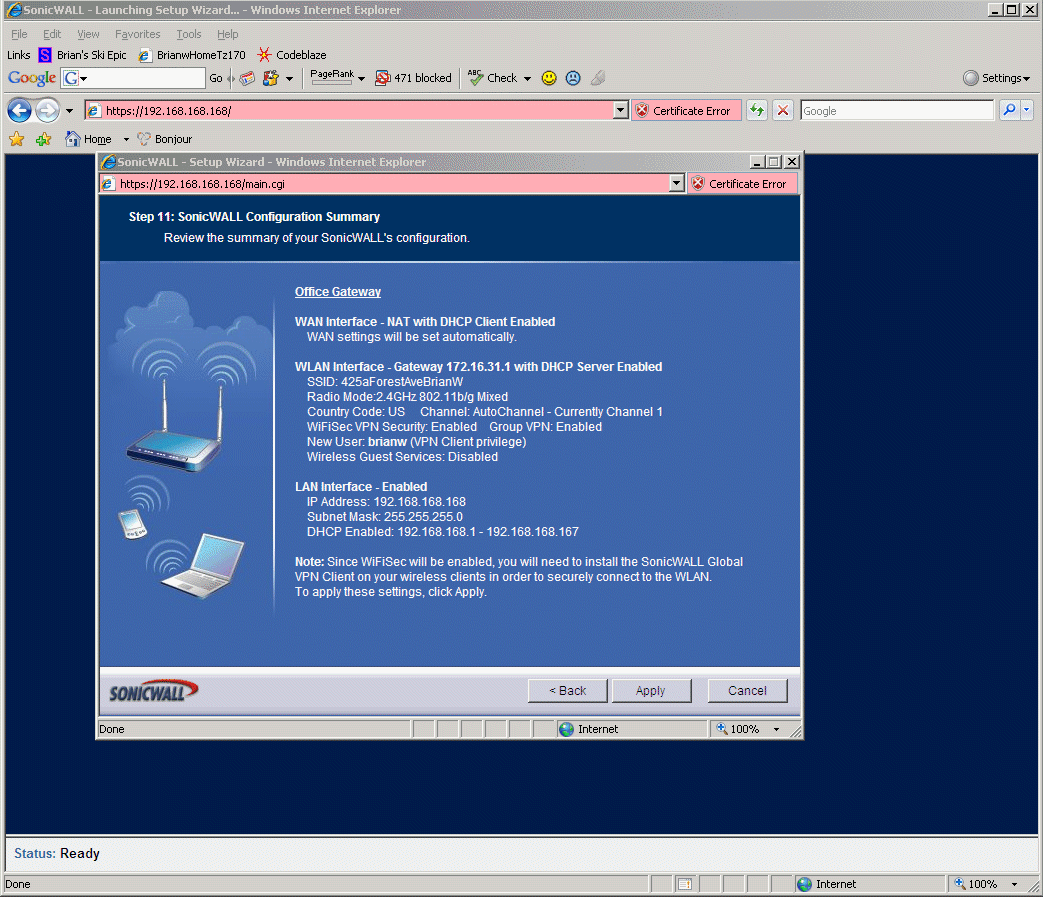
8.9 - below is the final summary of what happened in the setup wizard.
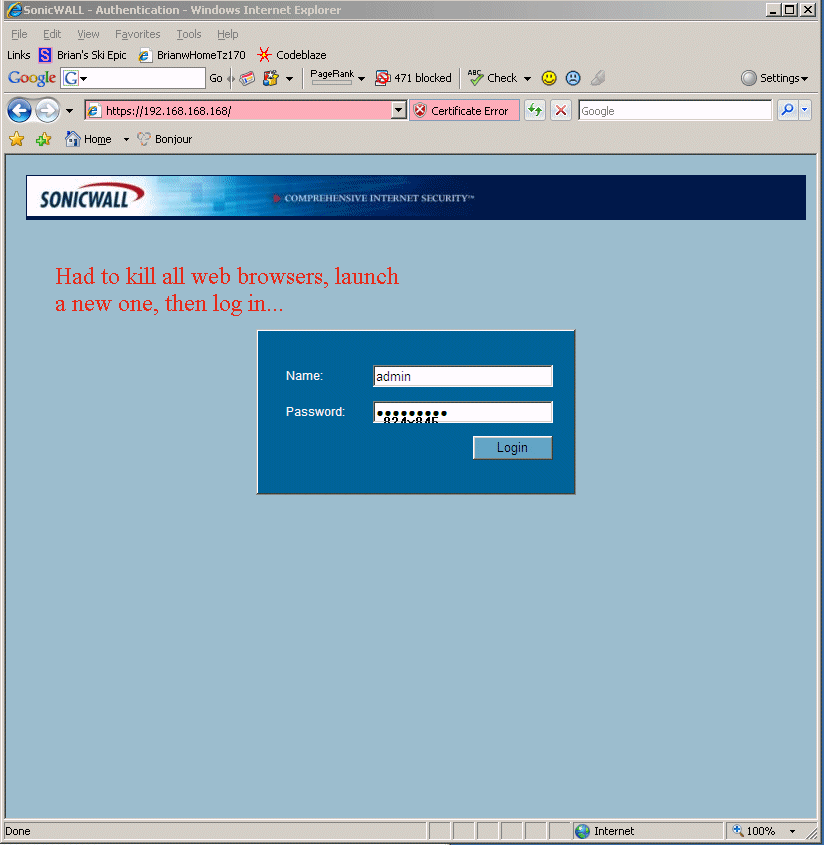
8.10 - When the TZ170W initial setup wizard completes, the experience FEELS like a disaster because everything stops working. It took me several tries to realize whenever it goes haywire during these setups, the first thing to try is to: A) Kill all your web browsers, and B) ipconfig /release, ipconfig /renew, and C) launch a new web browser. Many times this will bring the TZ170W back into talking with you for a little while longer, but sometimes you end up starting over booting the Sonic OS Enhanced from factory settings and taking a different path through the setup. The TZ170 is very, VERY fragile, very touchy during initial setup, it will wedge itself several times during this setup (and this is perfectly normal and expected, just plow through it).
8.11 - Funny story -> now I have no network connectivity ('cause I'm setting up my TZ170W as my internet connectivity), but it is asking me for information I can only get from http://www.mysonicwall.com. :-) Just leave this blank, I don't think this screen works anyway, and it is MUCH EASIER to get the TZ170W to convert to licensed a little later on...
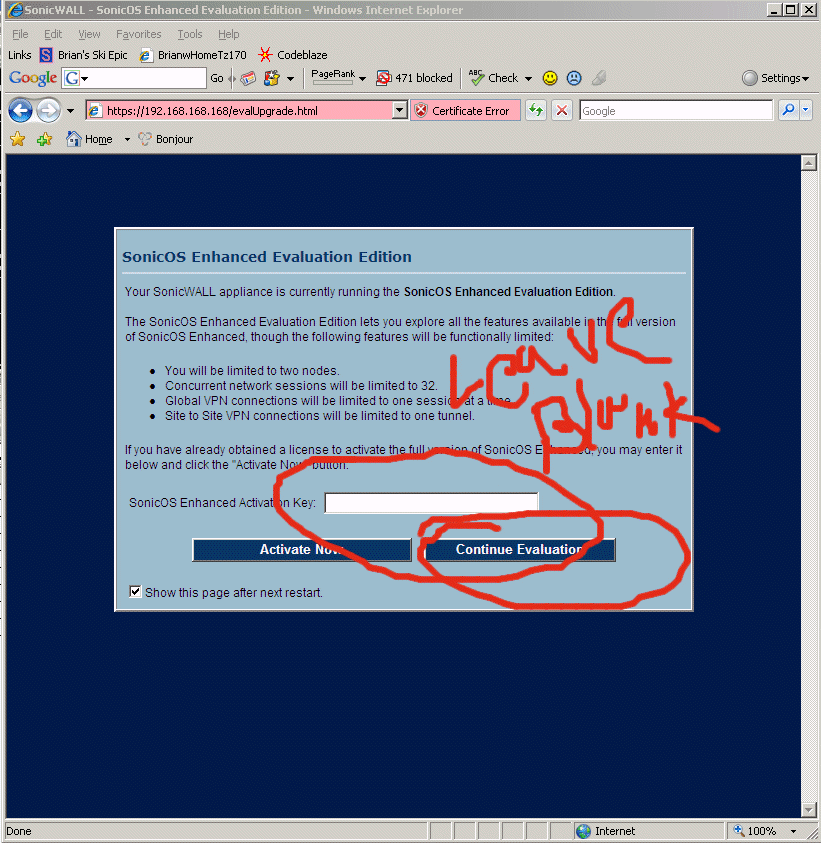
8.12 - Ok, there is a button hidden DEEP within the TZ170W which makes the TZ170W do a network request, hit http://www.mysonicwall.com and pull down all of it's license keys. See below for where it is. You go to "Security Services" -> "Summary" then click "Manage Licenses", then it pops up a dialog prompting for your mysonicwall username/password, then it makes you fill out a survey -> AND THEN IT SAYS IT FAILED!!! But it doesn't fail, it actually did work perfectly and retrieve all the licenses. See below....
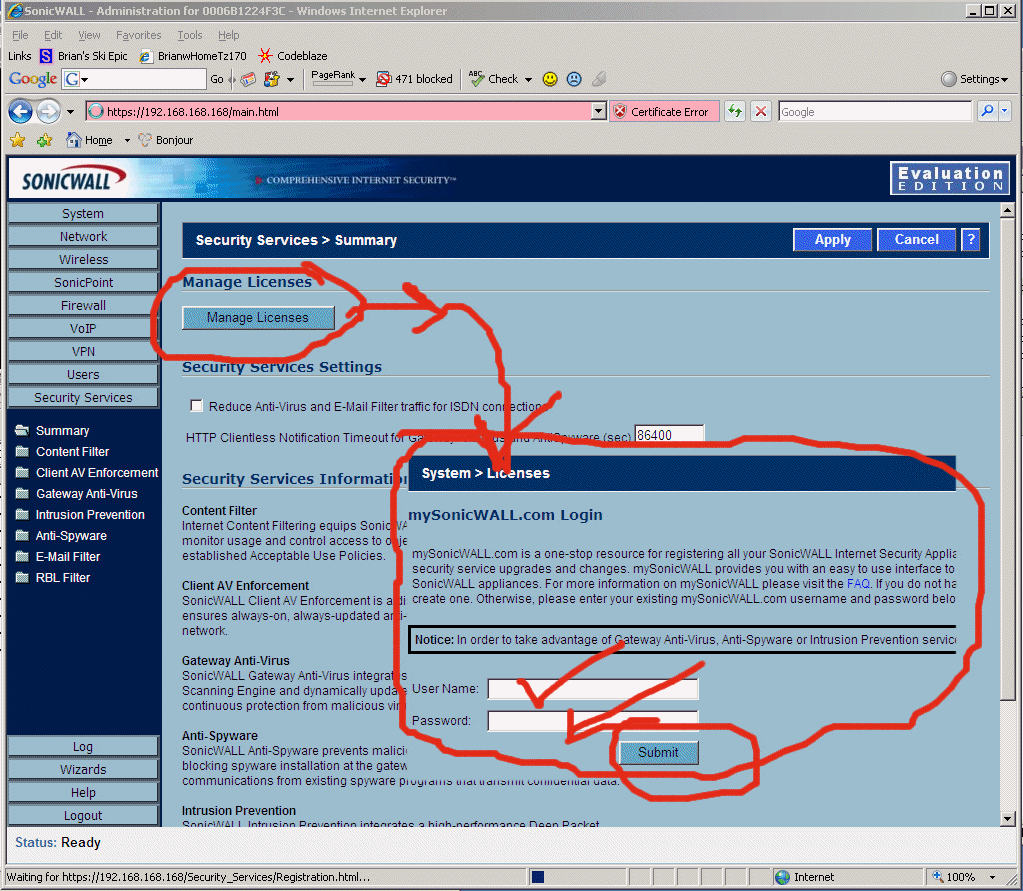
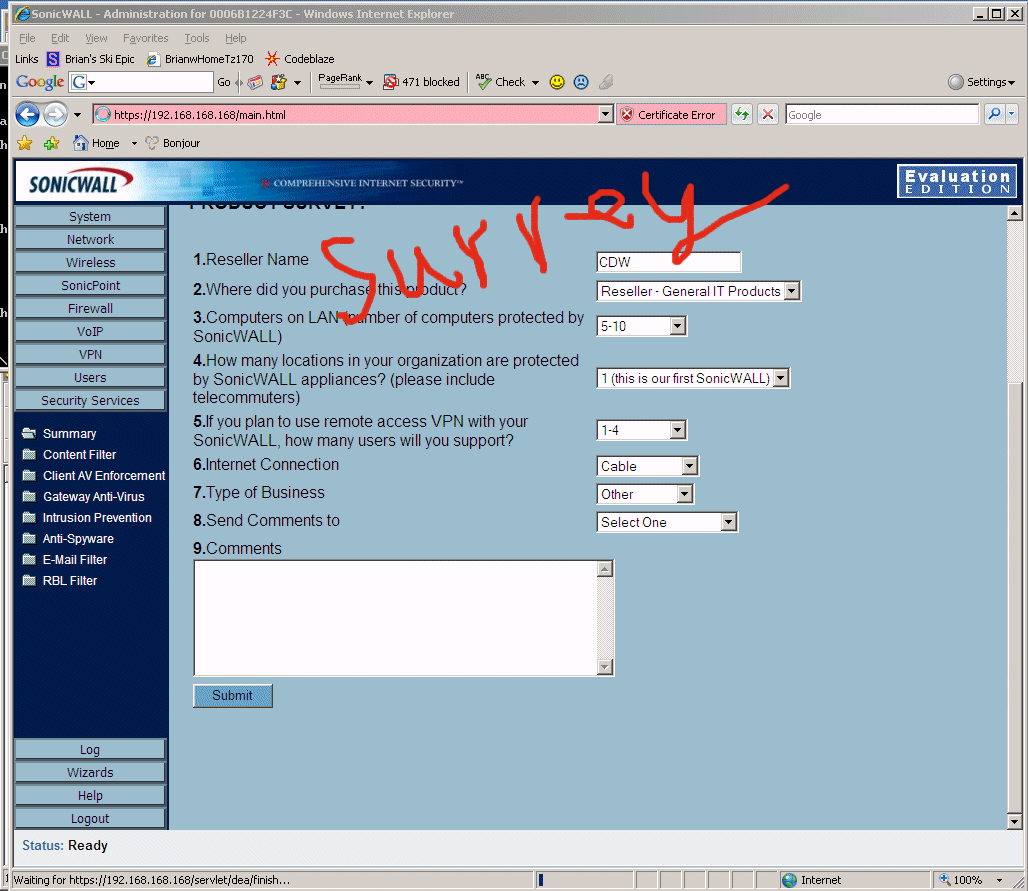
8.13 - fill out the survey or you can't get the TZ170W licensed. Since I did this 10 or 15 times while getting my TZ170W online, they got a lot of the same feedback. :-)
8.14 - OK!! Time to configure the custom Internal Network IP ranges and new default gateway ranges. When you do the steps below, the TZ170W will "wedge", you will need to pull the power plug out of it, wait 5 seconds, plug it back in. Kill all your web browsers. Then "ipconfig /release" and "ipconfig /renew", then launch a web browser and you can continue on with the installation at the NEW default gateway location. See notes in red below.
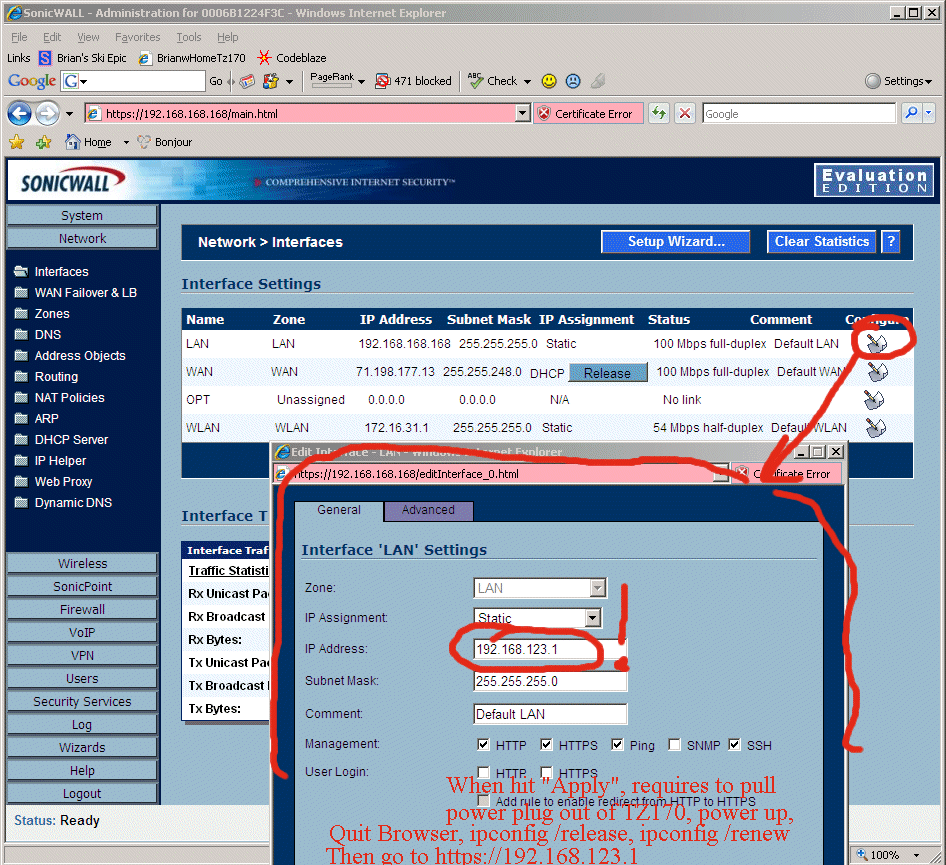
8.15 - now the thing to get done immediately is to configure the TZ170W to work properly with the machine you are configuring it FROM!! In my case this is a laptop called "redmoose". If you don't get this working immediately you might wedge the TZ170W and have to start over from factory settings, so get it done right away with the ordered steps below. The screen below shows that we have to move the internal network (LAN) DHCP addresses aside first.
8.16 - After the steps below, do the whole reboot/power cycle TZ170W thing again to bring it back online (TZ170W really are very fragile and wedge a lot during inital setup), but then the rest gets easier. Again, after this setup the TZ170W will be rock solid.
8.17
8.18 - in the next screen I touched up some stuff to be consistent with our choice of a new default LAN gateway IP address on the TZ170W, but I don't think it's necessary.
8.19 - Now we configure the VPN on the SonicWall TZ170W to allow remote road warrior users to VPN into our network. What is not shown here is you need to visit http://www.mysonicwall.com and purchase at least 1 VPN Client License for $50. Then do that thingy hidden down there that syncs the TZ170W with the mysonicwall settings (see step 8.12 for those instructions). Remember, the screen shots below are for "Sonic Enhanced OS" which has a different GUI than "Sonic Standard OS", but it's just close enough this might help you figure it out with that OS also. In the screen shot below I combined several "tabs" onto this one screenshot, I hope you can figure out what I'm doing here. Below are the most critical things, like you have to change it to "DHCP Lease" or VPN never works, stuff like that.
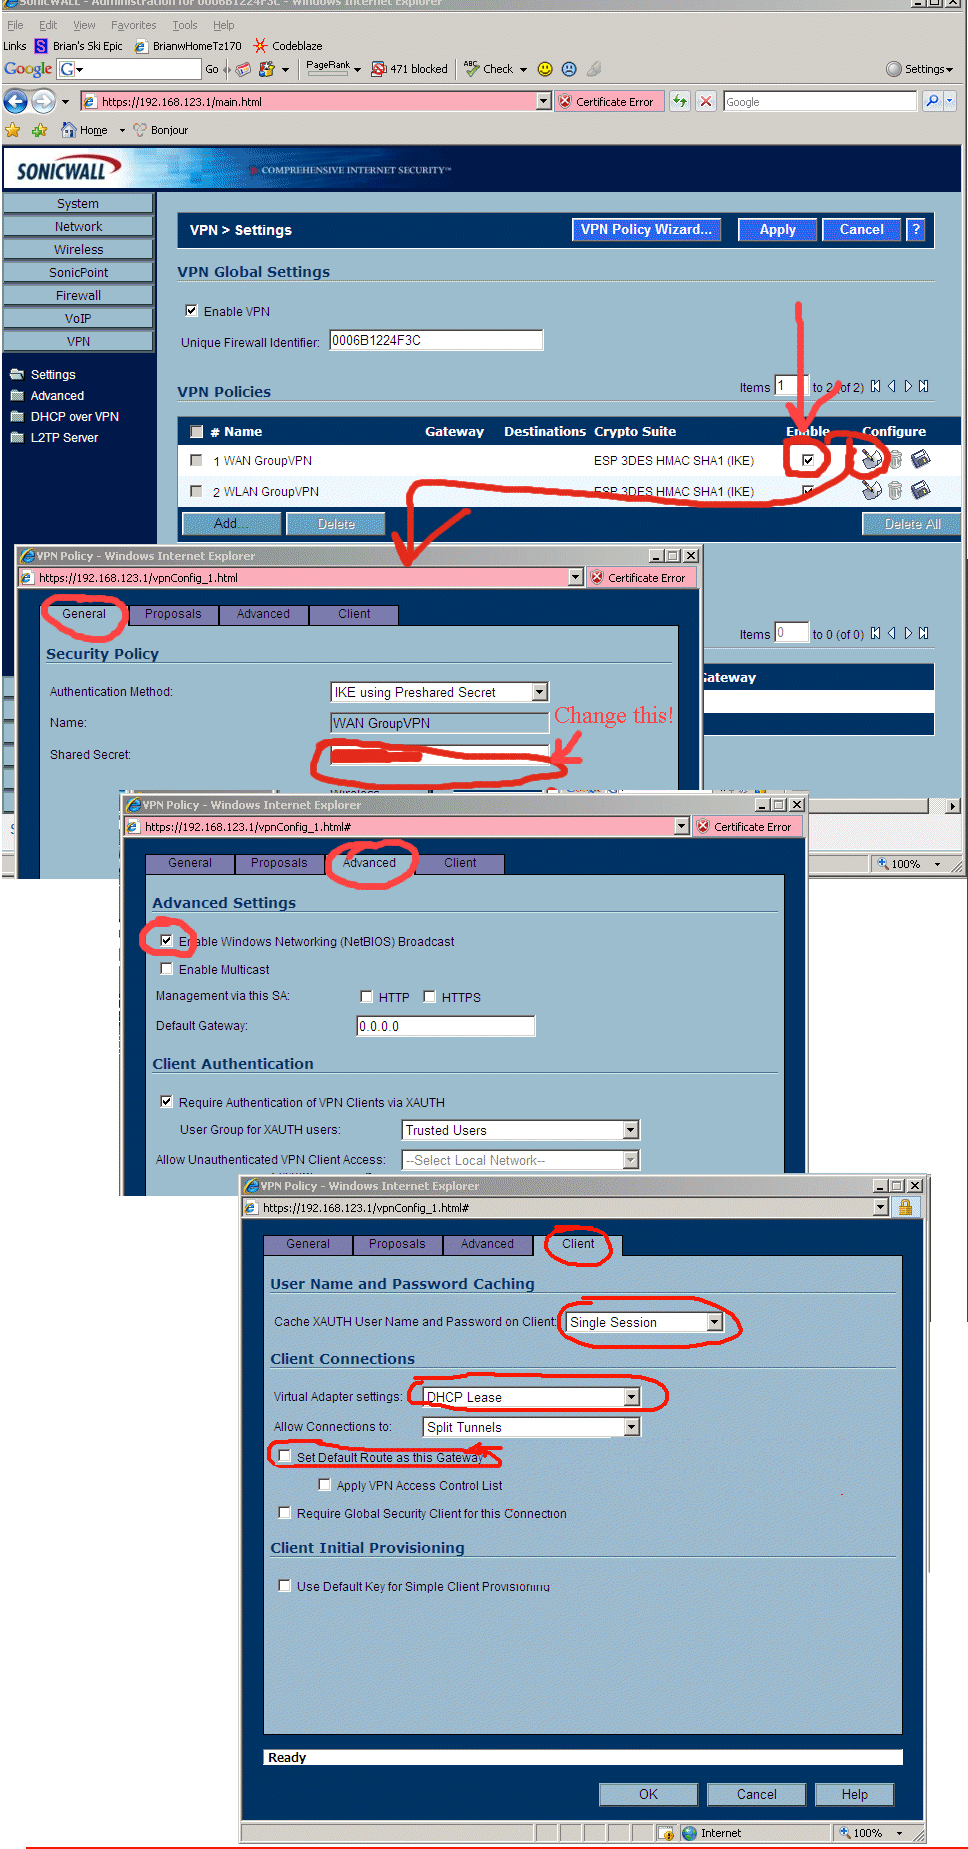
8.20 - On the TZ170W they like to put related configuration controls that MUST change at exactly the same time on totally separate pages -> to confuse you. Right after the above steps, you have to do the below steps. You can see how they really are the identical setting, both clearly say you want the VPN to hand out a DHCP address. You just need to configure it twice, in two different areas in the TZ170W, and in slightly different ways. Otherwise it doesn't work.
8.21 - Next to get VPN access working on the TZ170W you need to add a "TZ170W Local Users Login" for each road warrior type user that will use VPN. Make sure you get to that last tab and carefully select what that user has access to. WARNING -> originally I couldn't figure out what any of the terms in the dialog meant, so I selected "All Interface IPs" which is a ***MISTAKE***!!! That option is broken on all SonicWall Firewalls!! Instead, if you want VPN users to have access to everything, you instead use "Firewalled Subnets"!! Which in SonicWall's twisted world means "everything". Don't ask me why the TZ170's GUI is this awful, we all just have to live with it.
Trouble shooting SonicWall VPN -> ONE THING I HAD A LOT OF TROUBLE BUT FINALLY GOT WORKING -> On the computer that is doing the VPN into the internal network, I can EITHER have access to the "internal network" OR access to the Internet/WAN, but not both. For a while I chose to access the internal network, which then while VPNing into the SonicWall means I cannot access the internet. FIX TO THIS PROBLEM-> YOU SHOULD *NOT* choose "All Interface IP" in the above "VPN Access" tab in the above dialog. There is a horrible bug in the TZ170W where if you choose this, it actually doesn't work. Instead you have to specify "Firewalled Subnets" which somehow translates into "All The Places You Really Want To Go" in the SonicWall TZ170W's buggy and screwed up view of the world!!
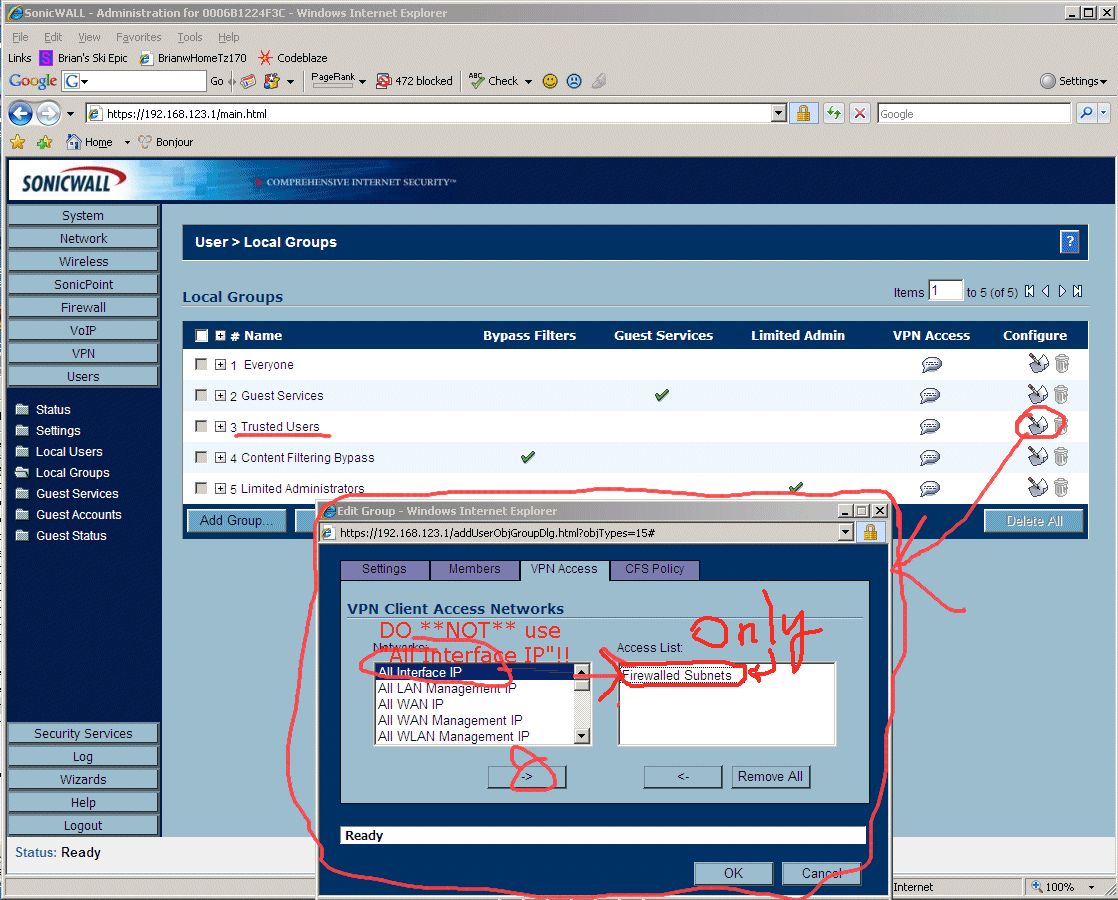
8.21b - I don't know if this is necessary, but I also went and setup "Trusted Users" to have "Firewalled Subnets" as their only entry in the VPN list, like the screen shot below shows:
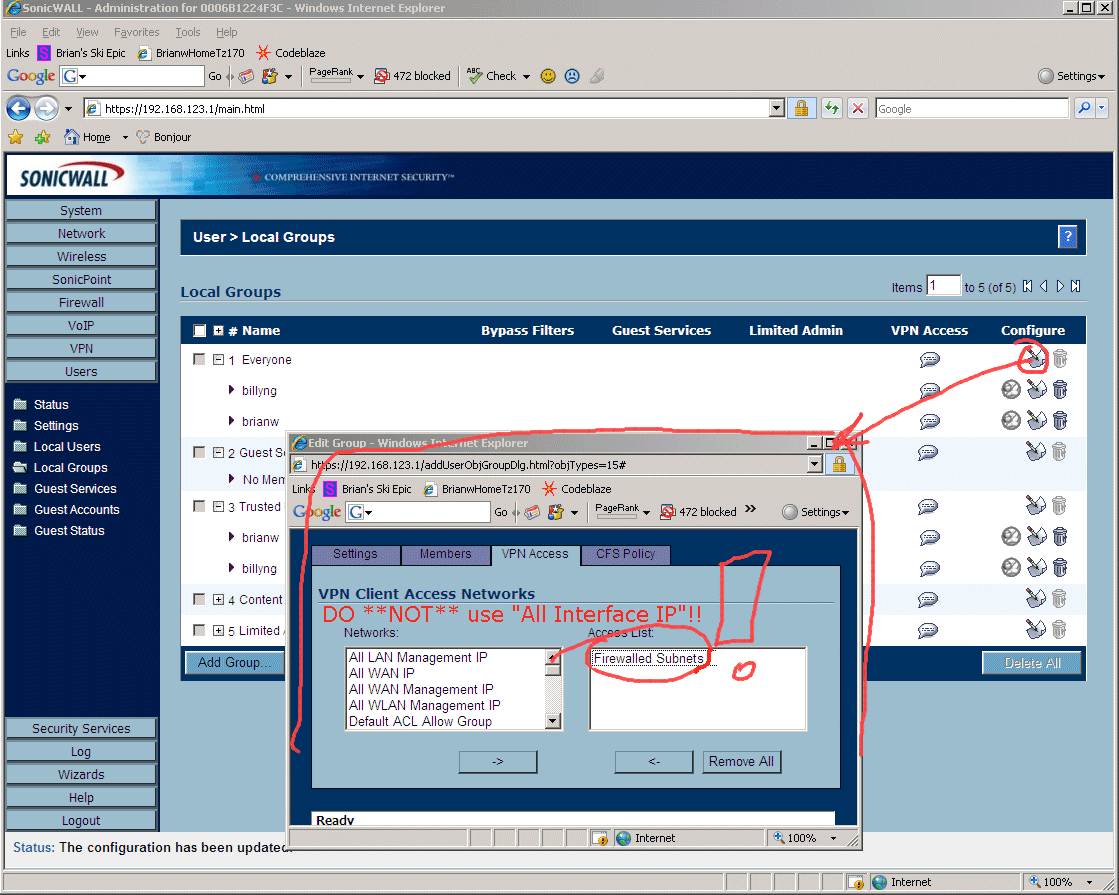
8.21c - I don't know if this is necessary, but I also went and setup "Everyone" to have "Firewalled Subnets" as their only entry in the VPN list, like the screen shot below shows:
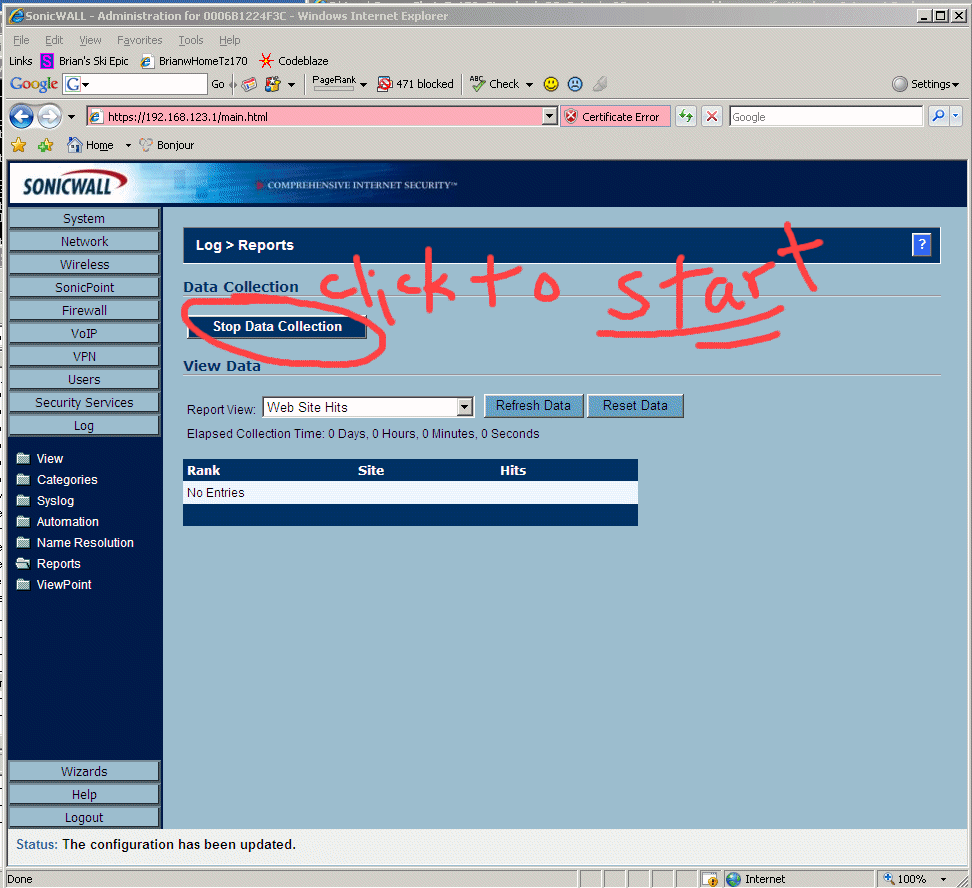
8.22 - Some of the defaults for "Sonic Enhanced OS" are different than the defaults for "Sonic Standard OS". Below I flip it so that I can watch what URLs are visited from my network. This can help me figure out if I have a virus on a computer, or where all the bandwidth is going if the network is slow, etc.
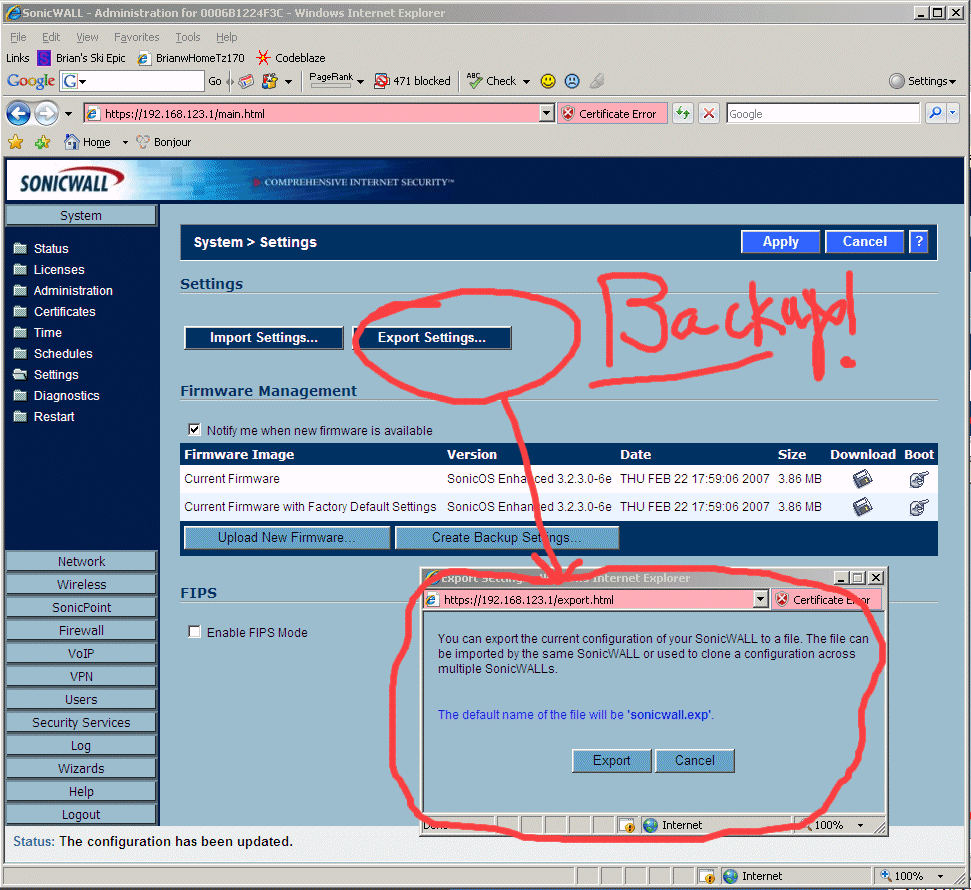
8.23 - FINALLY -> if you get this far, you would be insane not to backup all the settings on the TZ170W in their perfectly working fashion before you mess with them.
That's it!
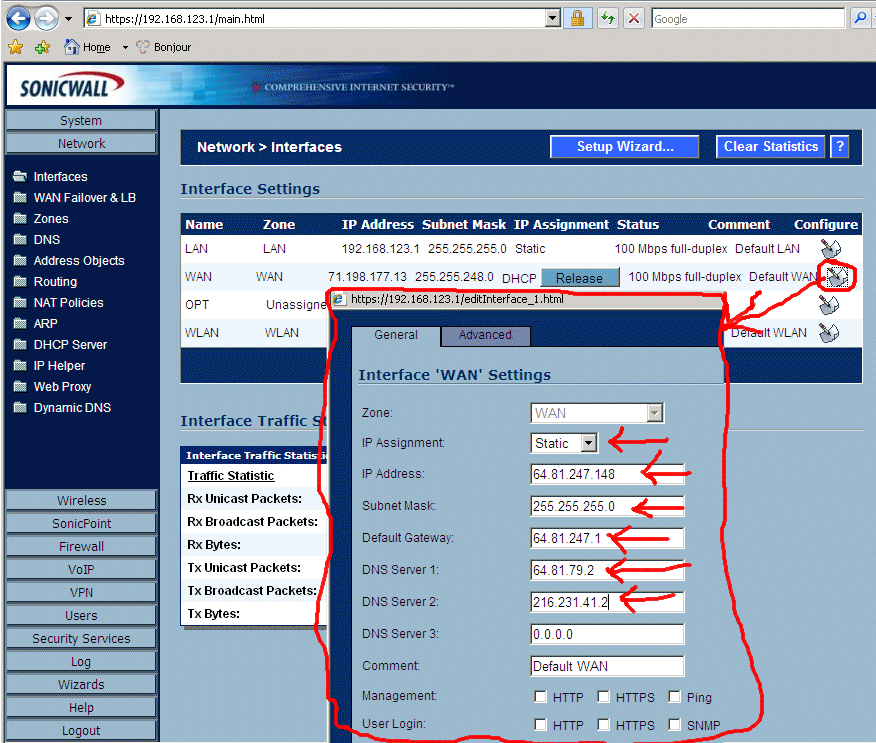
8.24 Added 3/20/07 -> I changed ISPs from Comcast (consumer DHCP cable modem) up to 4 static IP addresses with SpeakEasy DSL. Below is the change that brought that over. Just to make sure nothing in the future surprised me, I rebooted the TZ170W, then "ipconfig /release" then "ipconfig /renew" on a machine to make sure everything was groovy. I had to wait a bit, but then everything started working.
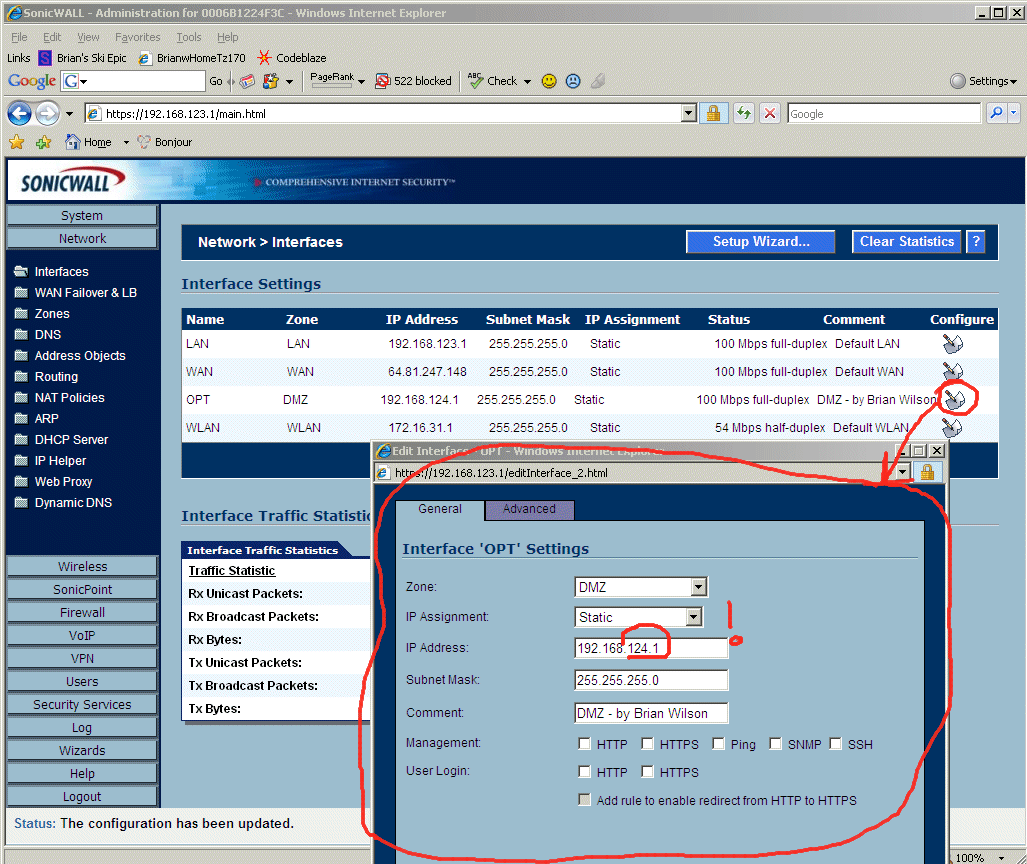
8.25 Steps to Configure the OPT port as a DMZ on the SonicWall TZ170W Firewall. The next 4 screenshots show the (non-intuitive) steps to configure SonicWall Enhanced OS on the SonicWall TZ170W Firewall to have a DMZ on the OPT port. Remember, the OPT port isn't even enabled on the SonicWall TZ170W until you buy Enhanced OS, so the next 4 screenshots are the WHOLE POINT of buying Enhanced OS. The first step is to enable the OPT port on the SonicWall TZ170W, and assign it the role of "DMZ", and tell it what subnet it should be on. I chose 192.168.124.1 as the "Default Gateway for the DMZ". Notice IT IS DIFFERENT than the subnet for the "Internal Network". We configure the OPT port as a DMZ in the "Network->Interfaces" screen in SonicWall Enhanced OS.
8.26 - The next step in configuring the DMZ on the OPT port on the SonicWall TZ170W Firewall is to allocate a range of IP addresses for the DMZ. This is much like allocating the range of IP addresses for the Internal Network we did earlier. We do this at "Network->DHCP Server" screen, see below.
8.27 - The next step in configuring the DMZ on the OPT port on the SonicWall TZ170W Firewall is to assign a well known IP address to each machine in the DMZ. I only have one machine there called "bkupdate". We do this in the "Network->DHCP Server" screen.
8.28 - The next step in configuring the DMZ on the OPT port on the SonicWall TZ170W Firewall is to map the external (also called "Public") IP address that the whole internet knows about into the internal machine you want that public IP address to route to. The first half of this final step is to do a little SonicWall voodoo dance I like to call "Creating Pointless and Confusing Objects". You would THINK this step is unnecessary, but you would be wrong. We *MUST* create magic "objects" that we can use to map the internal IP address to the external public IP address in the SonicWall Firewall. The screen below combines two steps onto one screen shot, you must go to "Network"->"Address Objects" and click the "Add..." button to add each of the following objects: "DMZ - External IP for bkupdate", and "DMZ - Internal IP for bkupdate". Notice the "External IP" belongs to the "WAN" zone, and the "Internal IP" belongs to the DMZ zone.
8.29 - Now for the second half of this step in configuring the DMZ on the OPT port on the SonicWall TZ170W Firewall. Some firewall vendors call this step "Port Mapping", but the SonicWall Firewalls call this "NAT Policies" found under "Network"->"Nat Policies". We use the "magic objects" we create in the above 8.28 step to map the public IP address to the private IP address. Notice we MUST check the "Create a Reflexive Policy" otherwise the packets can only come in, and cannot leave. Again, I'm using "Terminal Services" (which is "Remote Desktop") as an example that I can quickly test. Eventually this will be "port 80 web traffic" instead of "Terminal Services".
8.30 - The final step in configuring the DMZ on the OPT port on the SonicWall TZ170W Firewall is to write a firewall access rule to allow the traffic in from the WAN (Wide Area Net, the internet) into your DMZ. For me in my example, I used "Terminal Services" which is Window's Remote Desktop so that I could test it immediately (I didn't have a web server setup at this moment). In the screen below, I first had to click on "Firewall"->"Access Rules", then click on rules associated with "WAN"->"DMZ", then I did the stuff on the screen below which adds the firewall rule. Again, I'm using "Terminal Services" (which is "Remote Desktop") as an example that I can quickly test. Eventually this will be "port 80 web traffic" instead of "Terminal Services".

Whew! There you have it, the OPT port is now the DMZ on the SonicWall TZ170W.
Below is a picture of my machine room (also known as a closet in my home). Click on any picture to get a MUCH LARGER version zoomed in:
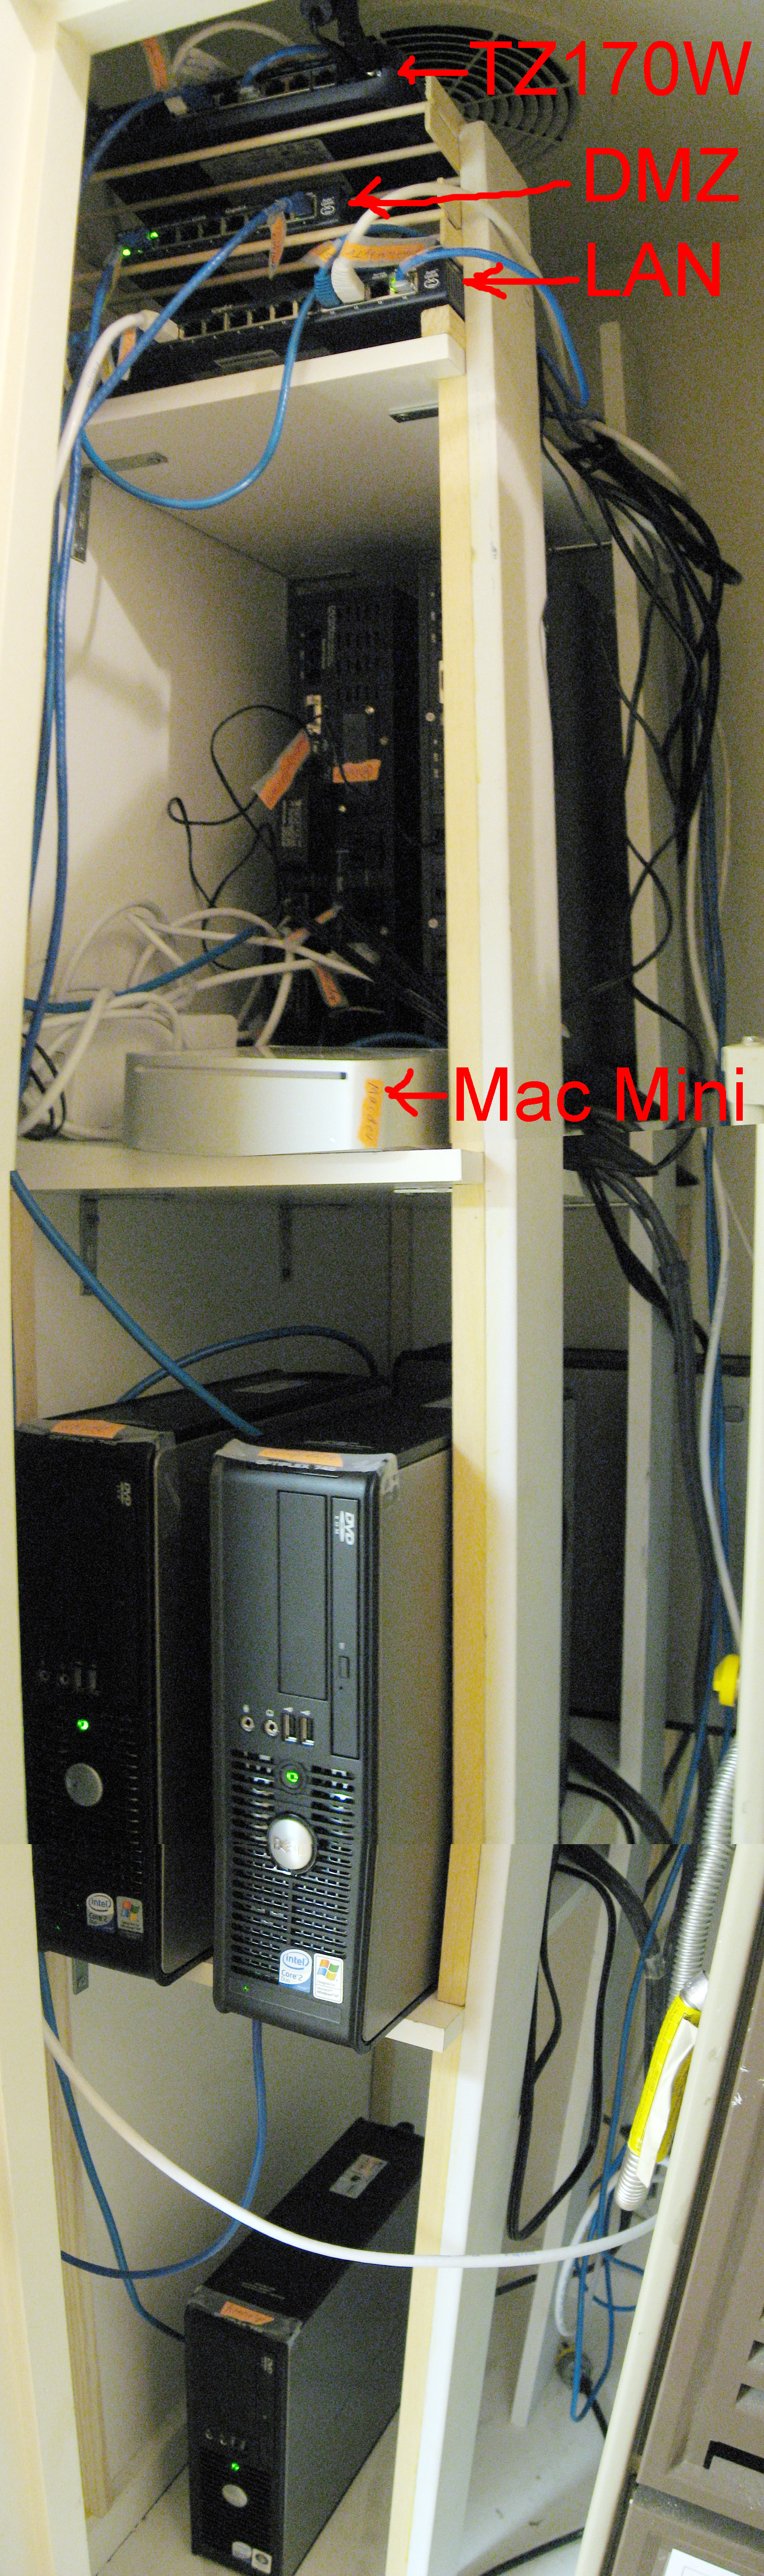
Below is a close up of the "network section" of the machine room, with red arrows showing connections.

Here is the network diagram again to compare to the above reality:
(Read
a personal
description of Backblaze here.)
![]()
Return to Small Business Setup