(by Brian Wilson, 2/21/07 - updated last 7/14/2011)
![]()

(Read
a personal
description of Backblaze here.)
This documents the steps I do to bring up my development environment in Windows so I can reproduce it from scratch quickly and not forget any steps. It takes about 2 hours assuming the machine comes from Dell with Vista Ultimate already installed.
Power up the Vista Ultimate box from Dell, go through the setup to get it on the network, get it all patched with the latest greatest Microsoft Security patches. The download for some "Vista Extras" was 2.5 Gigabytes, so this can take hours. The installation of the truly enormous "Display Languages" package took hours also. When all done, Windows Vista Ultimate takes about 20 GB of disk space, the rest of the disk is totally open.
Vista comes default with "Disk Virtualization" turned on which is a temporary feature providing backward compatibility for old broken programs. Unfortunately "Disk Virtualization" massively slows down disk accesses and destroys your Vista's system performance, so I turn it off by default (and this seems to work fine for all software I run anyway). *IF* this causes problems, the problems will be very very straight-forward to figure out (like a particular old piece of software will not install or run at all).
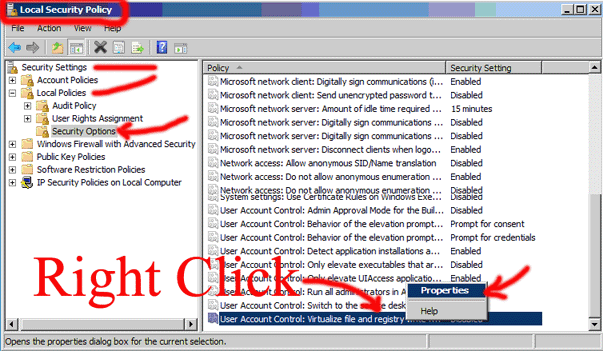
You turn off "Disk Virtualization" in the "Local Security Policy" tool, which is found by going to the "Start" menu, then selecting "Programs"->"Administrative Tools"->"Local Security Policy". Then in the pane on the left go to "Security Settings"->"Local Policies"->"Security Options". Then in the scrolling list on the right right click click on "User Account Control: Virtualize file and registry write failures to per-user location". Make that say "disabled". REBOOT after this to make sure everything is caught up and set correctly. Below is a screenshot of this Vista Control Panel with some of the important parts pointed out in red:
I found these instructions here on the web: How to Turn of Vista's Disk Virtualization, these also include a good explanation of what the heck this disk Virtualization is for and how to fix your software to not require it.
This takes about 20 minutes.
OBSOLETE, SKIP - 3.1 - pop the "Visual Studio 2005 Professional Edition" DVD into the machine, and run "\sv\setup.exe" (or use the autorun that pops up). My DVD is from my MSDN subscription. Updated 7/14/2011: Now Visual Studio 2010 Ultimate from MSDN subscription
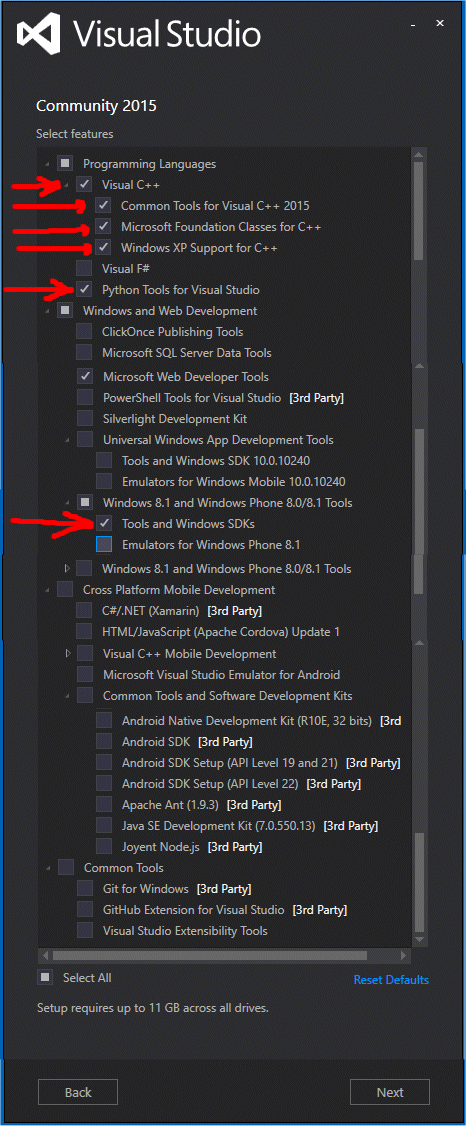
Choose these options, VERY IMPORTANT FROM THE BEGINNING: Under "Programming Languages" select "Visual C++" and all sub items, also select Python Tools. Lower down seleect Windows 8.1 and Windows Phone 8.0/8.1 Tools and check "Tools and Windows SDKs. See screenshot below.
OBSOLETE, SKIP - 3.2 - Select "Full Install", and on mine a license key is pre-filled out (from the DVD?) but you might need to find a license key.
OBSOLETE, SKIP - 3.3 - It goes along installing for 5 minutes, then pops up saying "Visual Studio 2005 has known compatibility issues with this Operating System", just click "Run Program". Then it goes for another 5 minutes and has same error message about "Microsoft SQL Server 2005", also click "Run Program", then same same for "Microsoft SQL Server 2005" **AGAIN**. (Updated 7/14/2011: no longer happens, smoother now.)
OBSOLETE, SKIP - 3.4 - When it says "Visual Stuio Setup has completed", click "Finish" button, and then it pops back up the "setup.exe" original screen.
OBSOLETE, SKIP - 3.5 - Now choose the second choice "Install MSDN Documentation". Choose full install, it is 2 GB. When it says finished, click "Finish" button.
3.6 - Exit out of installer, remove DVD from drive, then use "Windows Update" to hit the web and download any patches and fixes. Nothing was reported as available when I did this on 2/21/07. UPDATE: same thing on Windows Ten.
OBSOLETE, SKIP -3.6.1 - NEW ON 7/18/07 -> When I Launch Visual Studio as "Run As Admin" (see next step) it prompted me to "Look for a Solution Online", and at that point it provided "Visual Studio 2005 Service Pack 1 Update for Windows Vista" (28.9MB online patch). I tried to install it, but it failed saying the program wasn't the correct version. So *FIRST* I had to go install "Visual Studio 2005 Service Pack 1", ****THEN*** I installed this "Service Pack 1 Update for Windows Vista", then everything went fine.
OBSOLETE, SKIP - 3.7 - MICROSOFT RECOMMENDS -> RUN AS ADMIN (as of 2010 no longer necessary to run as Admin) -> Launch Visual Studio ("Programs"->"Microsoft Visual Studio 2005"->"Microsoft Visual Studio 2005") as admin by Right Clicking on that menu item and "Run as Admin". Then configure the following when it prompts you:
3.7.1 - Choose default evironment as "Visual C++ Development Setttings", then click "Apply customizations from the previous version to the environment selected above". Also choose "Light" color theme., then click "Start Visual Studio"
3.7.2 - Go to "Tools"->"Options", then change:
3.7.2.1 - "Environment"->"General" -> Change to "Multiple Documents" - Updated 7/14/2011: Does not exist anymore??
3.7.2.2 - "Environment"->"Keyboard"-> Change "Apply the following additional keyboard mapping scheme" to be "Visual C++ 6"
3.7.2.3 - "Environment"->"Keyboard"-> Add accelerator "<cntrl>g" for "Edit.FindNext" (NOTE: first you will need to remove <cntrl>g from "GoTo" and make that "<cntrl>T", and even BEFORE THAT get rid of <cntrl>t from "TransposeChar".)
3.7.2.4 - "Environment"->"Keyboard"-> Change accelerator "<cntrl>f" away from "Edit.Find" to the better "Edit.FindinFiles" (it will default to "search entire solution" so you will change that to "Only Current Document" on your first search)
3.7.2.5 - "Environment"->"Startup"-> Change "At Startup" to "Load last loaded Solution", and delete "Start Page news channel" and uncheck "download content every". This turns off the Microsoft Banner Ads and unnecessary network traffic.
3.7.2.6 - "Environment"->"Web Browser"-> Set home to be http://www.ski-epic.com, and default search to http://www.google.com
3.7.2.7 - "Projects and Solutions"->"Build and Run"-> Change to "Prompt to save all changes" before building
Update 7/14/2011 - 3.7.2.7.aa - "Source Control"->"Plug-in Selection"-> Change to "Current source control plug-in" to "None" (we use SVN)
3.7.2.8 - "Text Editor"->"General"-> Uncheck "Drag and drop text editing"
3.7.2.9 - "Text Editor"->"General"-> Uncheck "Selection Margin" (Turn off annoyingly stupid "collapse regions of code" feature.)
UPDATE 2015 - no longer turns it off. The feature is now called "Automatic Outlining" - right click on the editable area of a 'CPP' file on go to "Outlining" and select "Stop Automatic Outlining" for one text file. To turn feature completely off "Text Editor"->"C/C++"->"View"->Enable Outlining" change to "False".
3.7.2.10 - "Text Editor"->"General"-> CHECK "Indicator Margin" (To get area to put "stop signs" for debug breakpoints.) UPDATE FOR 2010: this did not work, but this works instead "Text Editor"->"C/C++"->"Formatting" set "Enable Outlining" to be "False". (Requires full restart of Visual Studio 2010 to take effect.)
3.7.2.11- "Text Editor"->"All Languages"->"Tabs" Select "Smart" for indentation and INSERT SPACES for tabs, insert size "4", tab size "4".
3.7.3 - Go to "Tools"->"Customize"->"Commands Tab", then add "Edit"->"Find Next" to the Find and Replace menu by dragging and dropping it in there UPDATE 2010 -> it is a little stranger, they got rid of the drag/drop interface, you have to "edit" it in a dialog.
3.7.4 - Go to "Tools"->"Customize"->"Toolbars Tab", then check "Debug Location" to get that toolbar
3.7.5 - UPDATE 2010 - RESTORE THE COLORS to rational non-blue (grey) backgrounds - FIX DESCRIBED HERE. Steps: install extensions from https://visualstudiogallery.msdn.microsoft.com/6f4b51b6-5c6b-4a81-9cb5-f2daa560430b double click to install, restart Visual Studio, find new "Theme" menu in menu bar and select "Windows Classic".
3.7.6 - TO TURN OFF
4.1 - Go to http://subversion.tigris.org/ and find the latest Windows binary versions. At the moment I did this, it was 1.4.3 released January 25, 2007. I found it as http://subversion.tigris.org/downloads/svn-win32-1.4.3.zip, inside that zip was a folder called "svn-win32-1.4.3". I also found the directions here useful (skip EVERYTHING about building from source code, section "D" is Windows Installation): http://svn.collab.net/repos/svn/trunk/INSTALL
4.2 - On ANOTHER computer (not the Optiplex) -> Copy all the contents to the directory "C:\Program Files\Subversion\" so that (for example) this binary exists: "C:\Program Files\Subversion\bin\svn.exe"
4.3 - Change PATH environment variable to include "C:\Program Files\Subversion\bin" -> you do this on Vista by going to "Control Panels", then click "Classic View", then open "System", then go to "Advanced System Settings" which pops open a "System Properties" dialog with the "Advanced" tab selected, then click "Environment Variables" button, then in "System Variables" edit "Path".
4.4 - Set APR_ICONV_PATH environment variable to be "C:\Program Files\Subversion\iconv" so that it has foreign language support
4.5 - Set SVN_EDITOR environment variable to be "C:\WINDOWS\System32\notepad.exe". (NOTE: on Windows 2003 it should be C:\Windows\notepad.exe)
Launch a "cmd.exe" command prompt and type the following commands in this exact order.
5.1 - mkdir C:\tree
5.2 - cd C:\tree
   5.3 - svn checkout svn://whistler/tree/trunk
         (alternatively for HTTP:  svn checkout http://bzsvn/svntop/tree/trunk)
When you run the above command, IT SHOULD first mention BrianSoftwareHouse, THEN prompt for a password, then check out a file into C:\tree\trunk\base\tmp.h (NOTE: you might need to add a username/password on whistler to this file: C:\svntop\tree\conf\passwd)
I don't install an entire unix shell package like Cygwin, instead I hand copy over only 3 or 4 programs like "ls.exe" so the command prompts have just a tiny bit more functionality and act a little bit more like a Unix shell. Also included in the install below are a few commands like "findref.exe" to find files, and "putty.exe" which allows for SSH TELNET access to other machines.
1) mkdir C:\bin
2) add C:\bin to your Path (on Vista by going to "Control Panels", then click "Classic View", then open "System", then go to "Advanced System Settings" which pops open a "System Properties" dialog with the "Advanced" tab selected, then click "Environment Variables" button, then in "System Variables" edit "Path").
3) Got to \\whistler\bowl\vista_unix_commands\ and copy any commands into C:\bin that you like, for example "LS.EXE". Feel free to copy all the files over.
4) FOR MANY COMMANDS (like the "touch.exe") you must copy the DLL \\whistler\bowl\vista_unix_commands\cygwin1.dll into your C:\WINDOWS\System32 directory. Also file://whistler/bowl/vista_unix_commands/cygwin.dll
5) Test this all by launching a command prompt (cmd.exe) and typing "ls -F" or "findref -help".
The "signtool.exe" (to code sign binaries) ships from Microsoft as part of the Windows SDK. Click here for a link to signtool.exe. Click here for the Windows SDK. For Microsoft Visual Studio 2008 it can be found installed at C:\Program Files\Microsoft SDKs\Windows\v6.0A\bin\signtool.exe
(Read
a personal
description of Backblaze here.)
![]()
Click Here to return to Ski-Epic Home, and Click Here to return to Random Stuff in Brian's Life